Okay, it is evident if you search my blog that I do love supernova. They are to me, the most fascinating subject because of not only signaling the death of a star or of the star’s remnant, but because they signal also how the universe continues to create new things from old. From Disney’s 1994 animated movie (great year, it was the year my son was born and a year after my daughter had arrived) the Lion King, some call this the Circle of Life. Items are created or living things are born, they live out a life, and then are recycled so that other things may be created, come into existence. We ourselves exist because of this cycle that exists in the stars. The iron in our blood, the calcium in our bones, the oxygen in our lungs, the carbon in our bodies are all elements made in stars or massive stars. Indeed, the only place that iron is made is in the core of a massive star and that signals the very death knoll for that star when the core churns out iron.
So, to celebrate the roles that Supernova play in creating the very elements that make up our earth and ourselves, I have decided to come up with a Supernova Observing Challenge. I am not the Astronomical League so I can’t give you a pin or a certificate but the true joy in completing this challenge is in observing the objects themselves or giving them a go. Here is what equipment I would recommend.
1. At least a 10 inch dob. You can try it in a smaller one and I would be anxious to hear if someone does one or all of these in a dob smaller than 8 inches.
2. A good wide field eyepiece. I tend to use my 27mm Panoptic, my 35mm Panoptic, my 30mm ES 82 degree eyepieces for these observations. A 31 Nagler would also be an outstanding tool to use.
3. Also have two eyepieces that provide from 100x to 200x also as you will want to look at some parts of what you view with a little more magnification. For me in the 17.5mm dob or in the 24mm dob I would probably use either the 20mm and 10mm Pentax XW or the 17.3 and 10mm Delos.
4. A 2 inch OIII filter and a 2 inch Narrowband filter, and have a 1 1/4 inch filter of the same types for higher magnification eyepieces. I have the Orion Ultrablock, the DGM OIII and NB, and the Thousand Oaks OIII and NB filters in these sizes to choose from.
5. The findercharts here or the ones I will link to and good transparent skies. It helps if you also can sketch an outline of what you’ve seen I think as part of recording your observation.
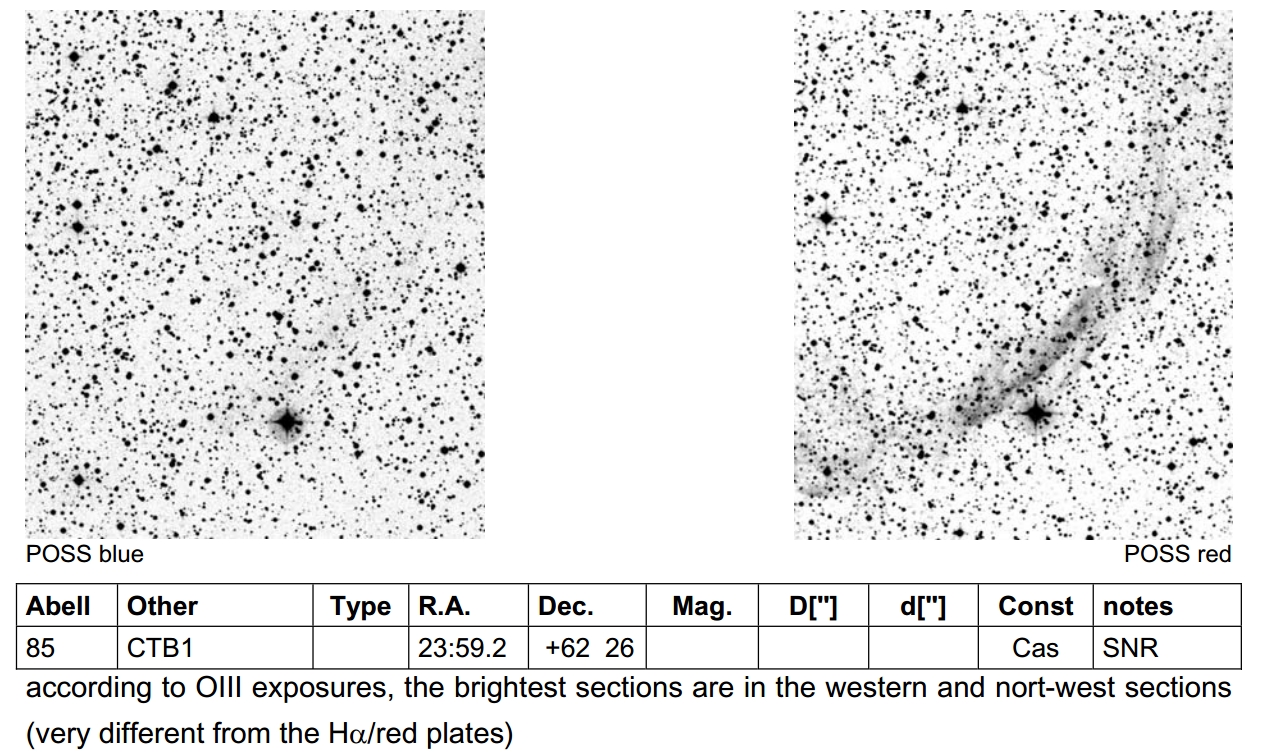
So what are the objects we are going after? Here is the list. Simeis 147 or Sharpless 2-240, a SNR that is a winter observation between Auriga and Taurus. IC 443 or Sharpless 2-248 another winter SNR found in Gemni. SN 1054 or Messier 1 The Crab Nebula in Taurus will be part of this. We then move into the warmer SNR’s with Sharpless 2-91 in the southern part of Cygnus the Swan and then to the Veil Nebula made up of NGC 6960, 6974, 6979, 6992, and 6995. As summer wanes and fall constellations appear we will end (or begin since you can do summer and fall now if your up late enough) with Cassiopeia A. Finally we’ll end with Abell 85 or CTB1 in Cassiopeia as well.
I have created a log book that I will attach or provide a link to my Google Docs where you can access it. Feel free to modify it as you wish.
1. Simeis 147 or Sharpless 2-240.
First item up is Simeis 147. This is a faint supernova remnant in Taurus and Auriga, and you must not be faint of heart. It took me 3 seasons before I caught a wiff of this one. I have included an enlarged version of a star hop map by Reinar Vogel from his WebSite at this LINK. The findercharts come from his Sharpless Catalgo, a free download and one I recommend highly LINK. Here are the findercharts for this object(s).
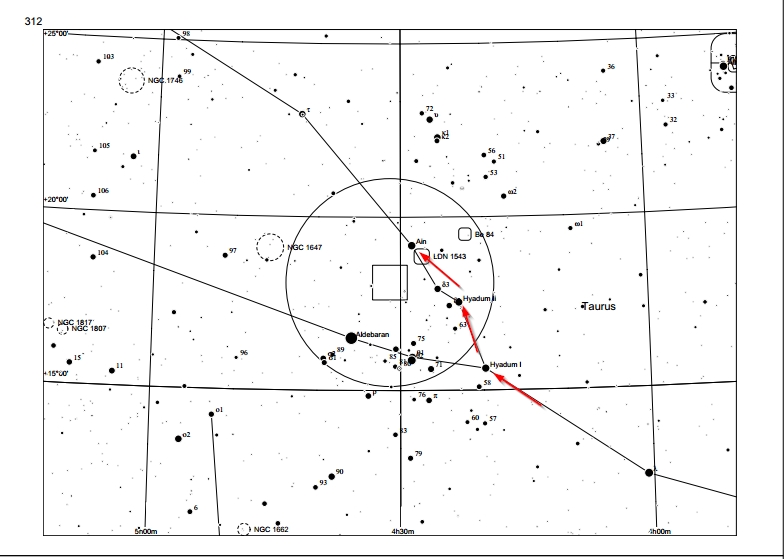
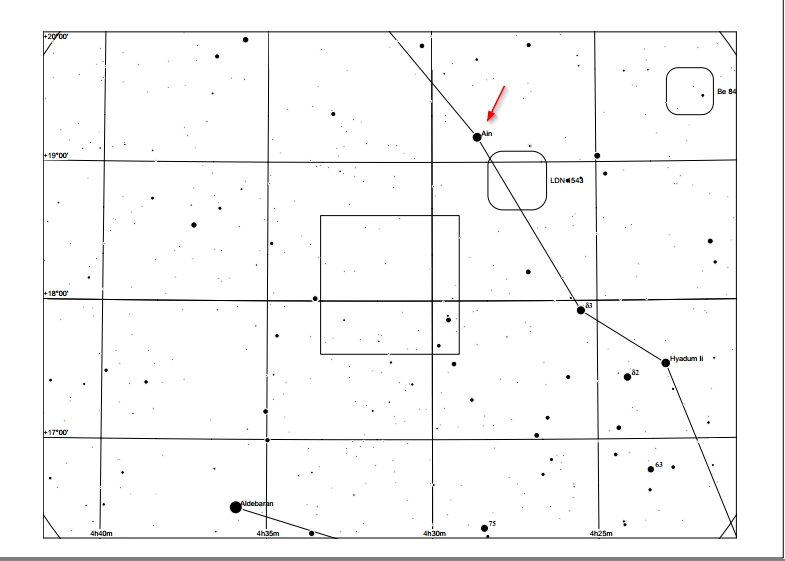

I will include two star hops and you can choose which one you want. Start at Zeta Tauri and work your way up to the stars the curve left above. Then from the top star, the bright one, HIP 26272 go up to that first group of zig zag stars and then over to the left to the second group. Follow the second group straight up to Messier 1.

This is similar but you go from the first curve set of stars, to a quadrilateral on its side to the bright star, up to Messier 1 that way. Rather easy to find and one to mark down.
To observe this one a medium to high power eyepiece helps and try a filter, both OIII, NB, and perhaps a light pollution filter if you have it. I have used my 7mm Pentax XW and my DGM NB filter and seen filaments so do something similar and see if you draw out the filaments in your observations.
3. IC 443 Supernova Remnant in Gemni
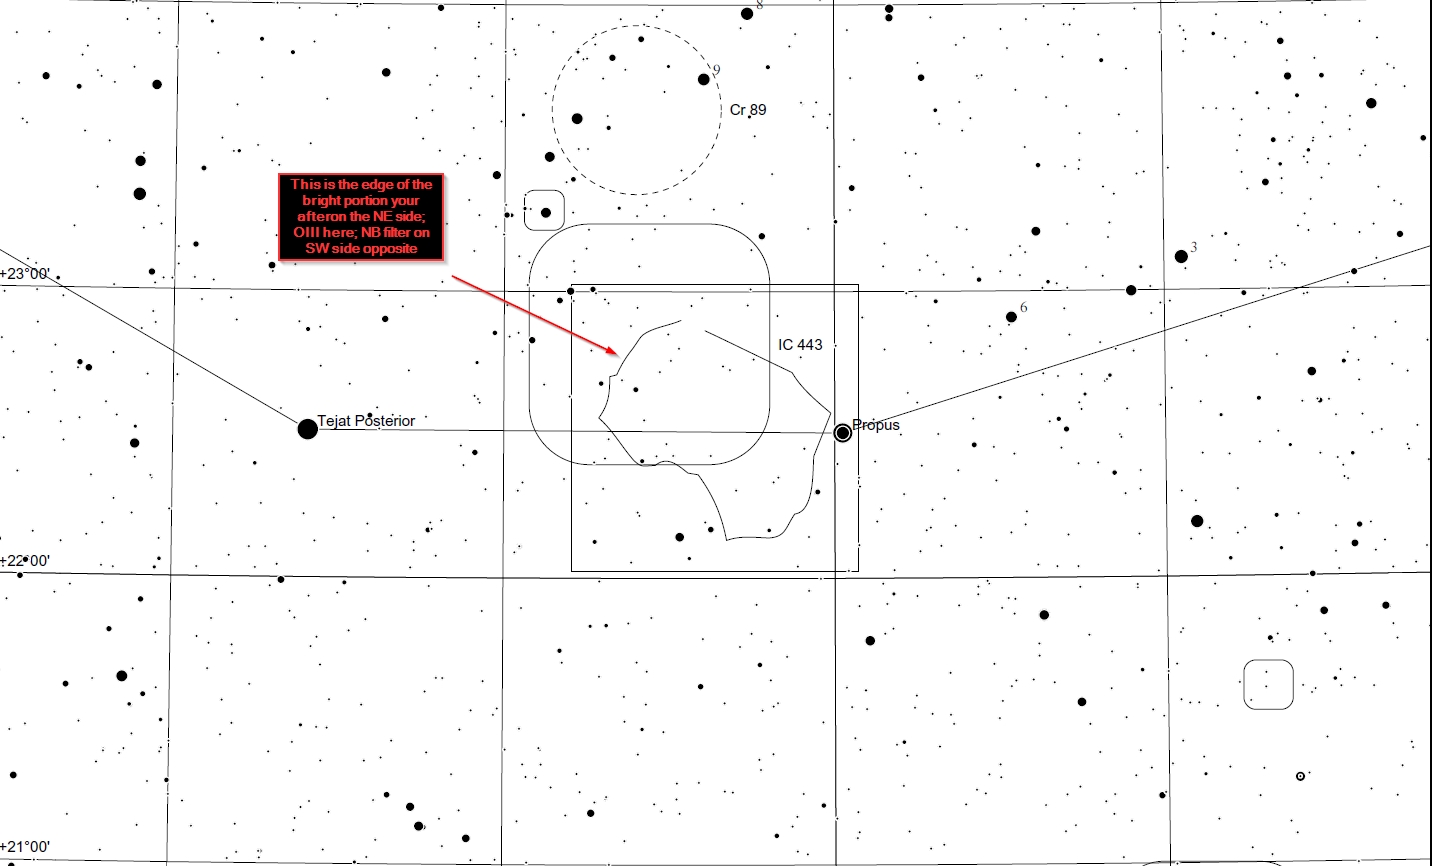
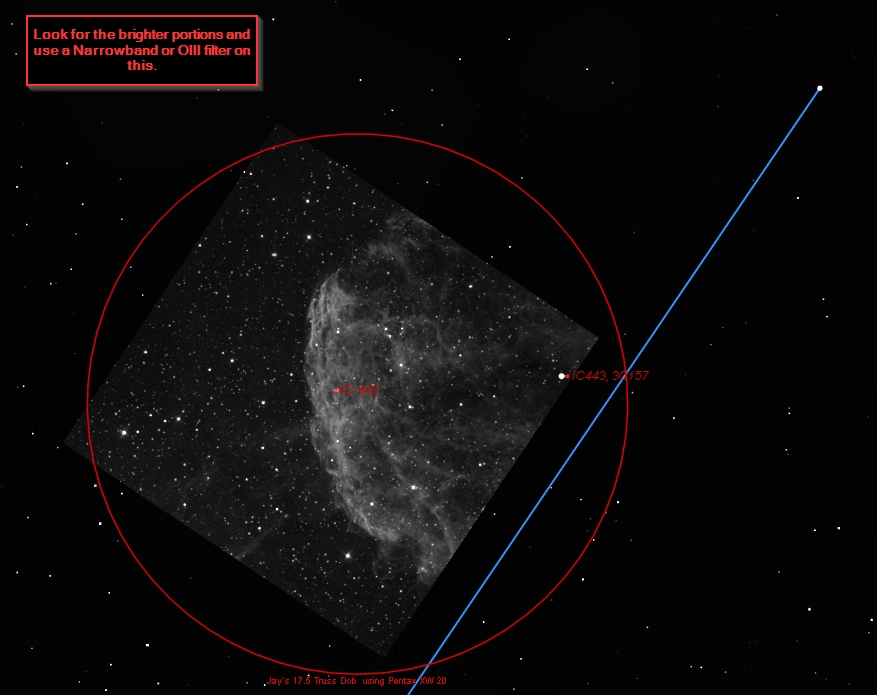
This is another winter supernova remnant, in the generally same area as Simeis 147 and M1. It makes sense to me to go for Simeis 147, then M1 then IC 443 as they rise in that order. When observing this one, aperture surely helps as does an OIII filter for the NE part and a Narrowband or UHC filter on the SW part. See how much detail you can tease out of this. It’s there, more than most will see but you have to be patient and dark adapted. Observe this one for a good long while before sketching or moving on.
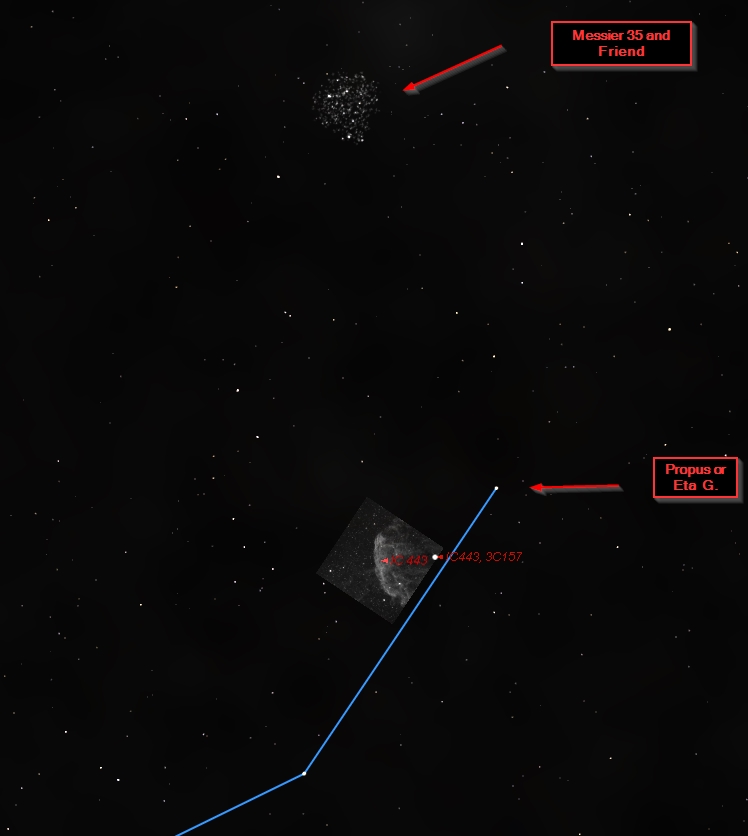
Some information IC 443 or Sharpless 2-248; LINK: IC 443 (also known as the Jellyfish Nebula and Sharpless 248 (Sh2-248)) is a Galactic supernova remnant (SNR) in the constellation Gemini. On the plan of the sky, it is located near the star Eta Geminorum. Its distance is roughly 5,000 light years from Earth. Observing at Skyhound has a good article on IC 443 also at this LINK.
IC 443 may be the remains of a supernova that occurred 3,000 – 30,000 years ago. The same supernova event likely created the neutron star CXOU J061705.3+222127, the collapsed remnant of the stellar core. IC 443 is one of the best-studied cases of supernova remnants interacting with surrounding molecular clouds.The SNR optical and radio morphology is shell-like (e.g. a prototypical shell-like SNR is SN 1006), consisting of two connected sub-shells with different centers and radii. A third larger sub-shell, initially attributed to IC 443, is now recognized as a different and older (100,000 years) SNR, called G189.6+3.3. The remnant’s age is still uncertain. There is some agreement that the progenitor supernova happened between 3,000[3] and 30,000 years ago. Recent Chandra and XMM-Newton observations identified a plerion nebula, close to the remnant southern rim. The point source near the apex of the nebula is a neutron star, relic of a SN explosion. The location in a star forming region and the presence of a neutron star favor a Type II supernova, the ultimate fate of a massive star, as the progenitor explosion.
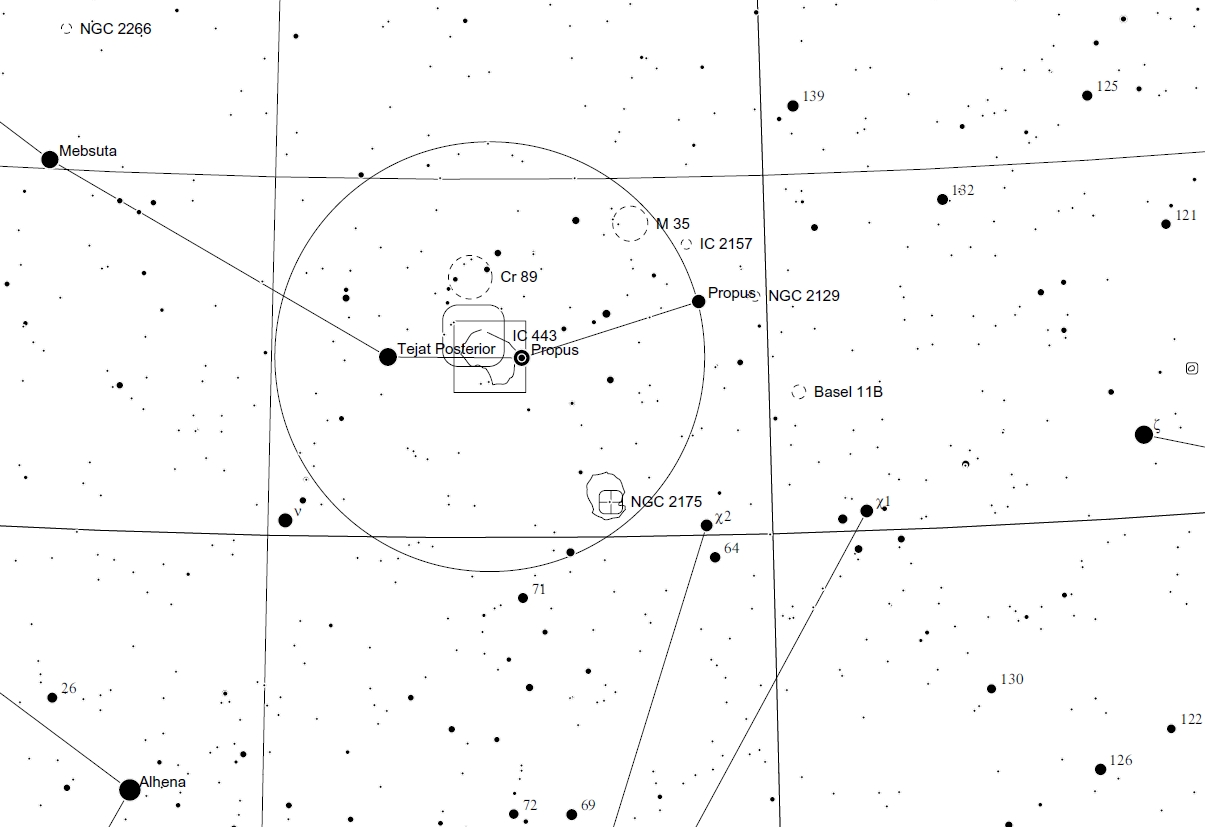
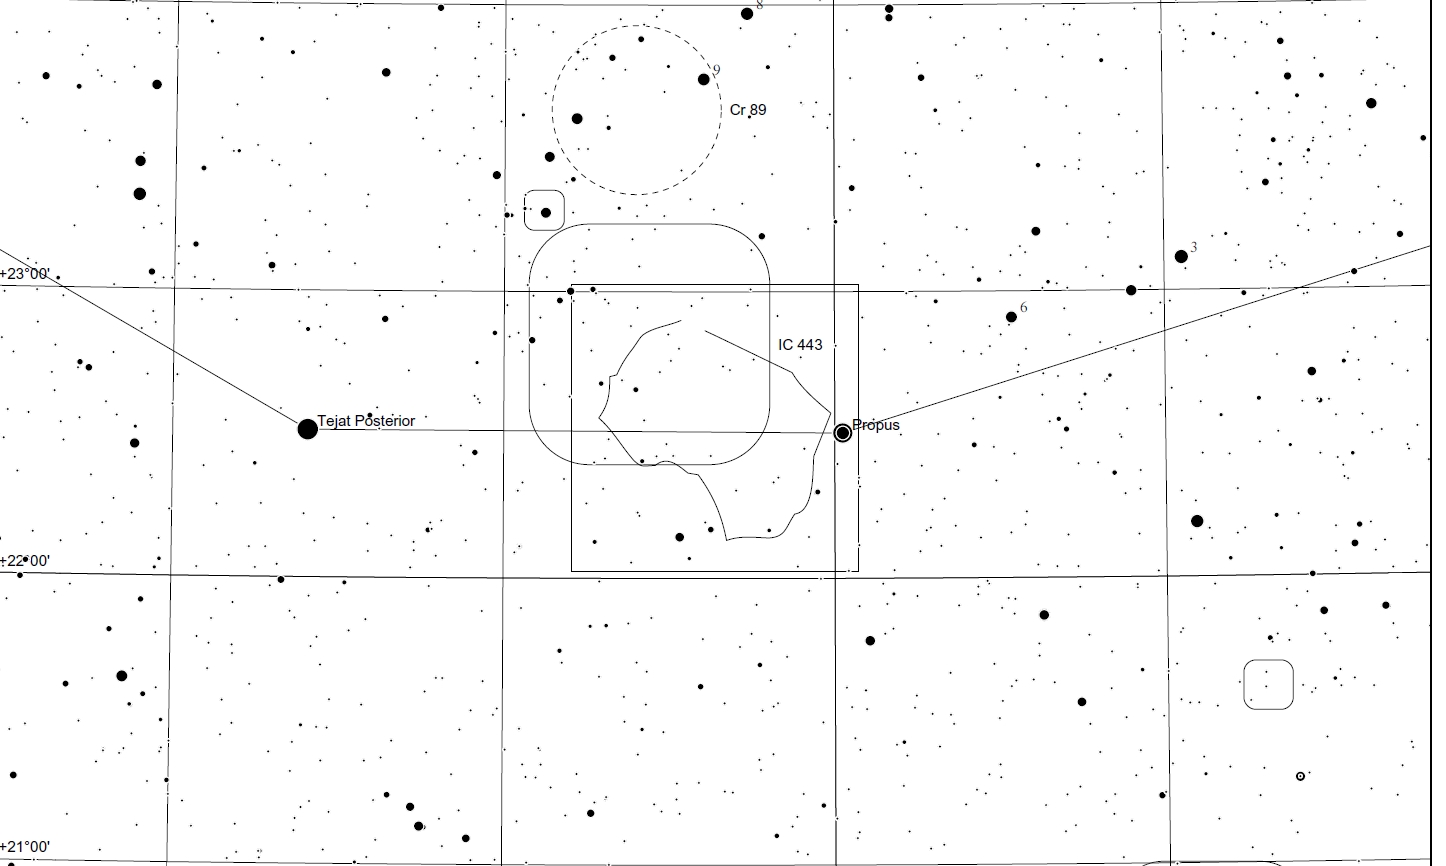
Reinar agreed to let me use his charts so others can get an interest and observe these fun objects! Here is his finderchart that I have made quite larger. If you want the hard copy let me know, I will upload them into Google Docs and make them available.

2MASS Atlas Image of IC 443. In this false-color infrared image, blue marks expanding gas where emission is dominated by excited iron atoms; the southern ridge (in red) is dominated by molecular hydrogen emission. In the image North is up, East is left. It is the blue segment of Iron molecules that are excited that you are going after and will use the OIII filter on. The Hydrogen needs the Narrowband filter and is hard to tease out as you must have very good skies that night.
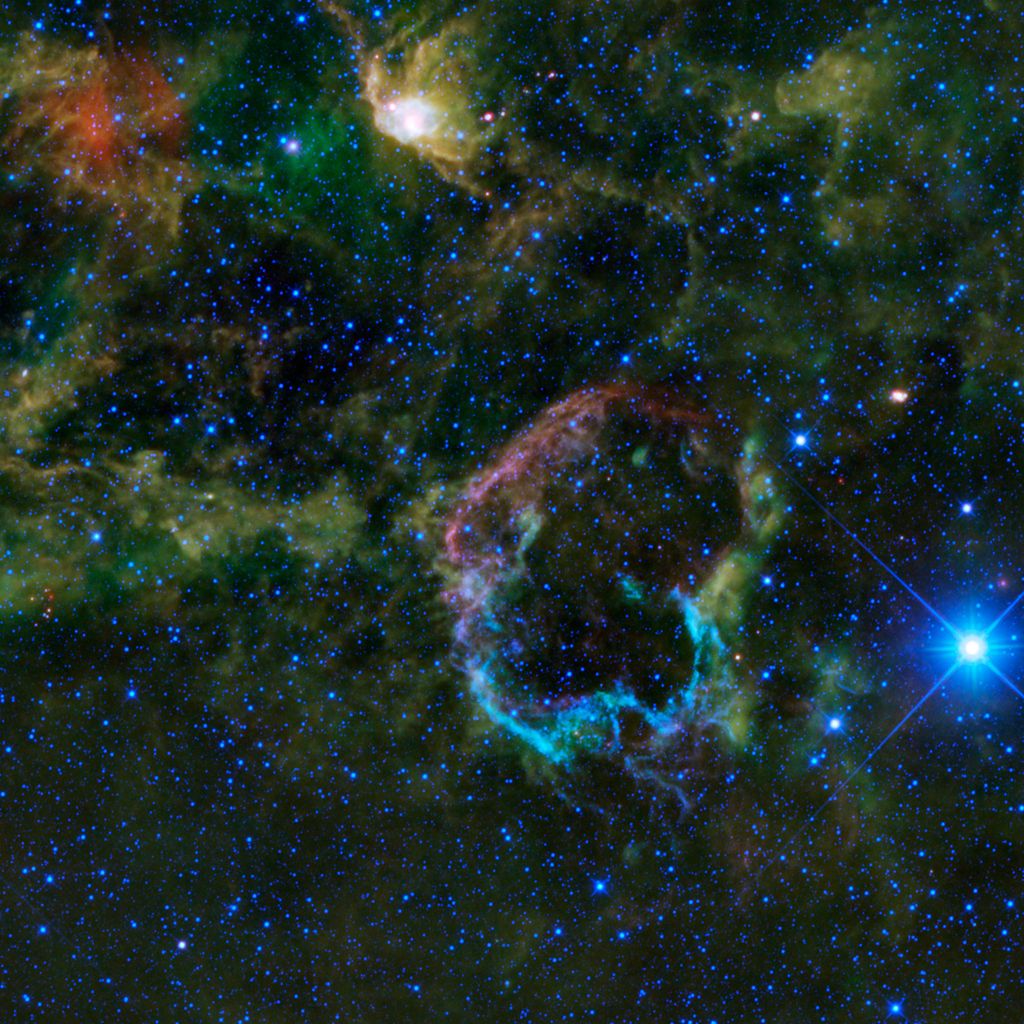
This is from the NASA/WISE team capture of IC 443.This oddly colourful nebula is the supernova remnant IC 443. IC 443 is the remains of a star that went supernova somewhere between 5,000 and 10,000 years ago (they have narrowed down the time frame now). The blast from the supernova sent out shock waves that traveled through space, sweeping up and heating the surrounding gas and dust in the interstellar medium, and creating the supernova remnant seen in this image. What is unusual about the IC 443 is that its shell-like form has two halves that have different radii, structures and emissions. The larger north-eastern shell, seen here as the violet-colored semi-circle on the top left of the supernova remnant,(the one that you are going after here as the main part of your observation and responds well to the OIII filter) is composed of sheet-like filaments that are emitting light from iron, neon, silicon and oxygen gas atoms and dust particles heated by the blast from the supernova. The smaller southern shell, (needing the narrowband filter to bring out parts if your lucky and the sky is with you) seen here in a bright cyan color on the bottom half of the image, is constructed of denser clumps and knots primarily emitting light from hydrogen gas and heated dust. These clumps are part of a molecular cloud which can be seen in this image as the greenish cloud cutting across IC 443 from the north-west to south-east. The color differences seen in this image represent different wavelengths of infrared emission. The differences in color are also the result of differences in the energies of the shock waves hitting the interstellar medium. The north-eastern shell was probably created by a fast shock wave (100 kilometers per second), whereas the southern shell was probably created by a slow shock wave (30 kilometers per second). If you look at what a lot of astro-photographers capture and other images (Hubble) of IC 443/Sharpless 2-248, you see the Jellyfish structure that gives it its name. In this image by WISE, I think IC 443 looks much more like a Supernova Remnant. To be honest, in many Type II SNR’s I see many similar structures in them which raises questions but not for here.
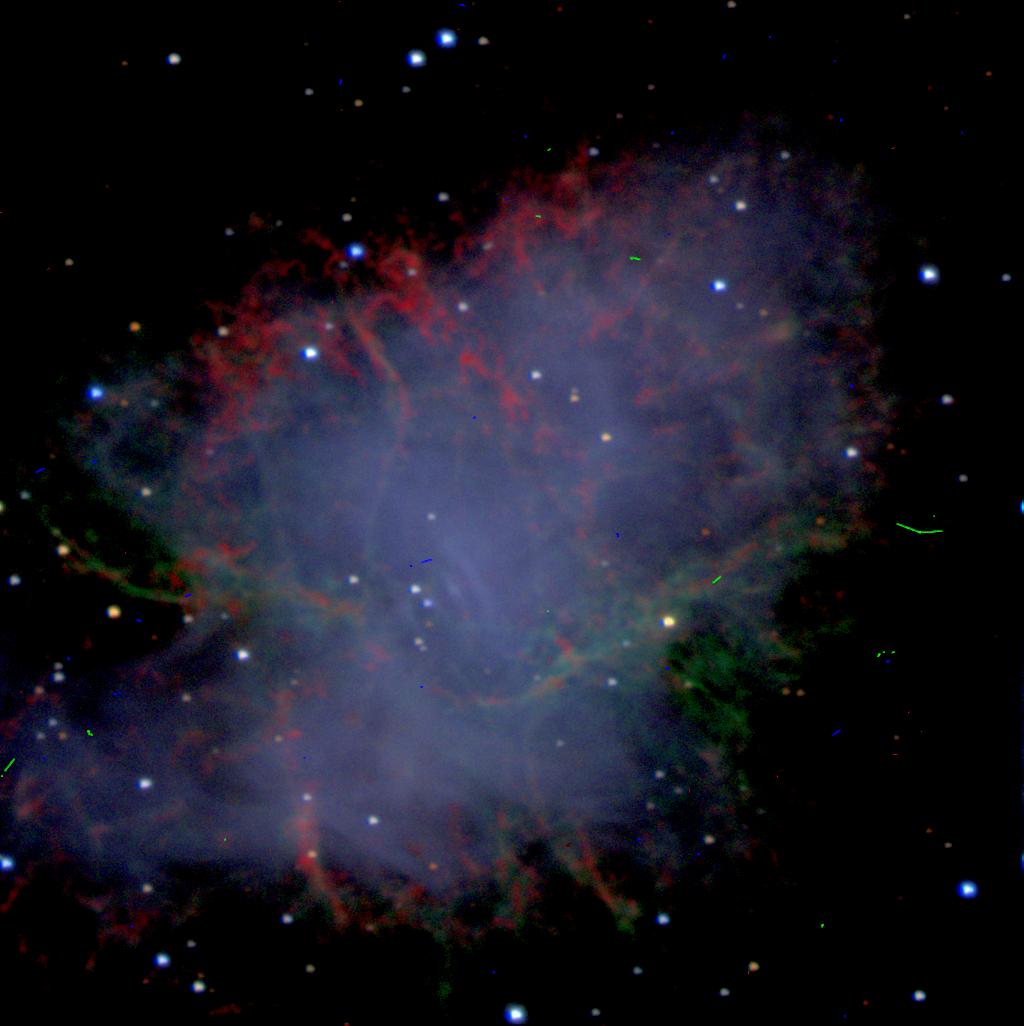
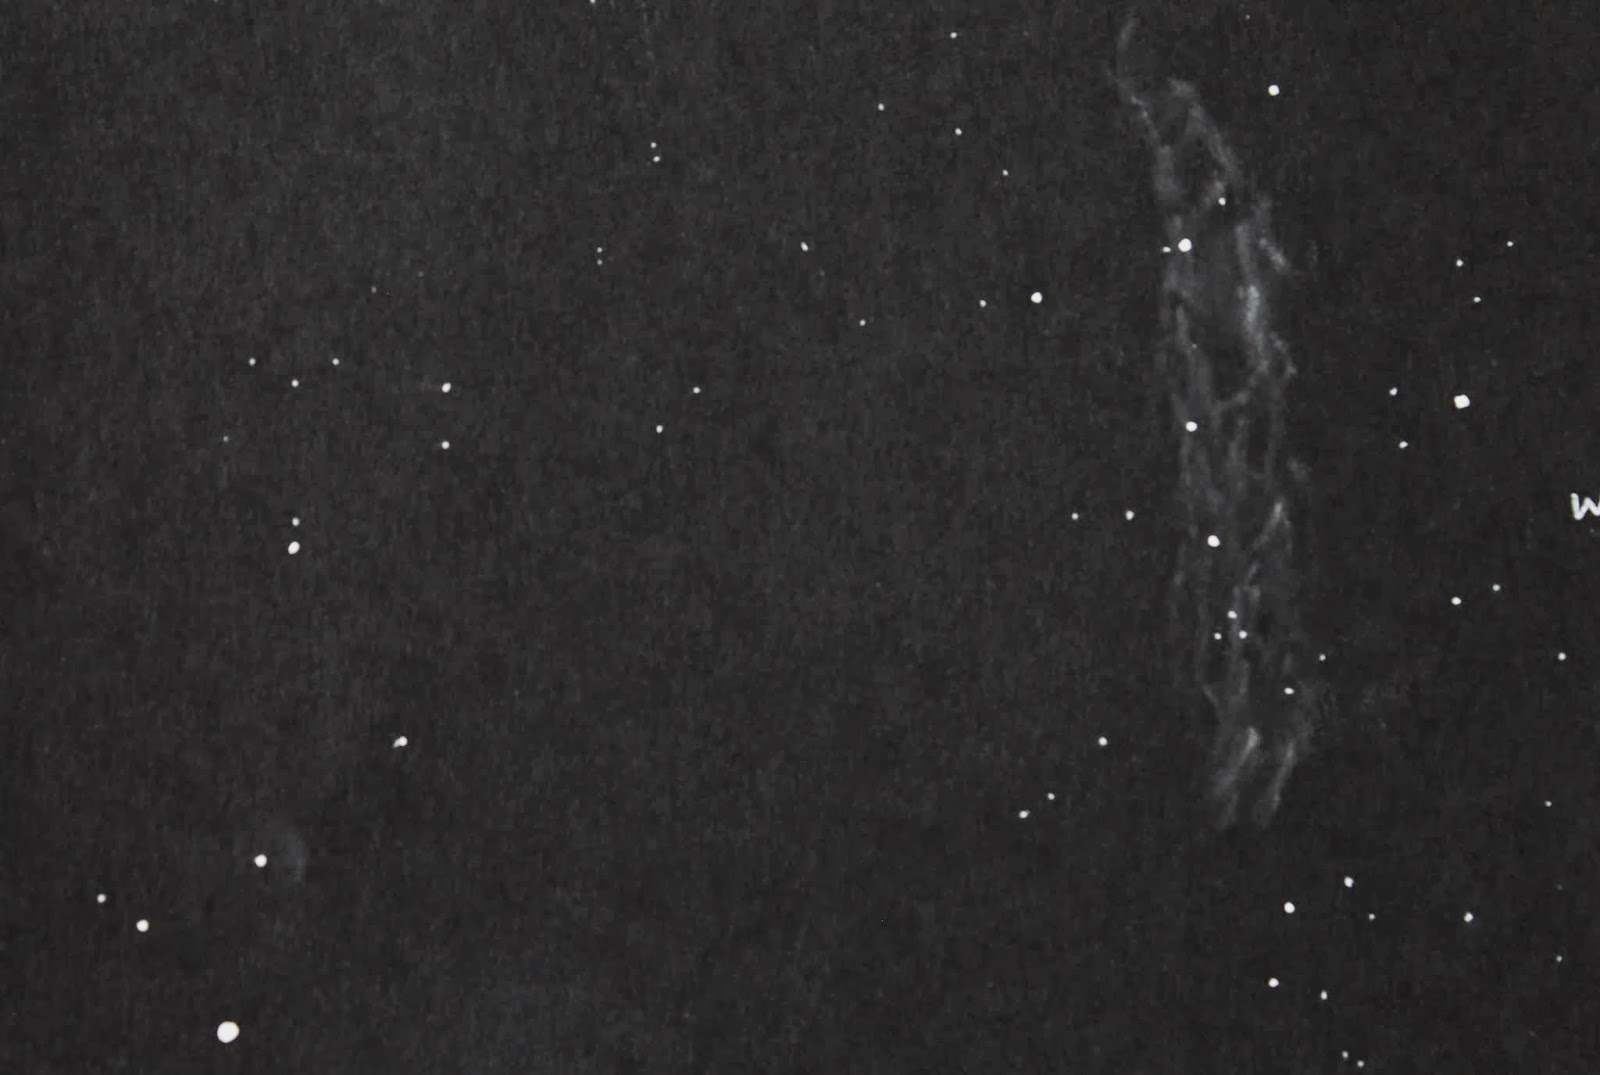
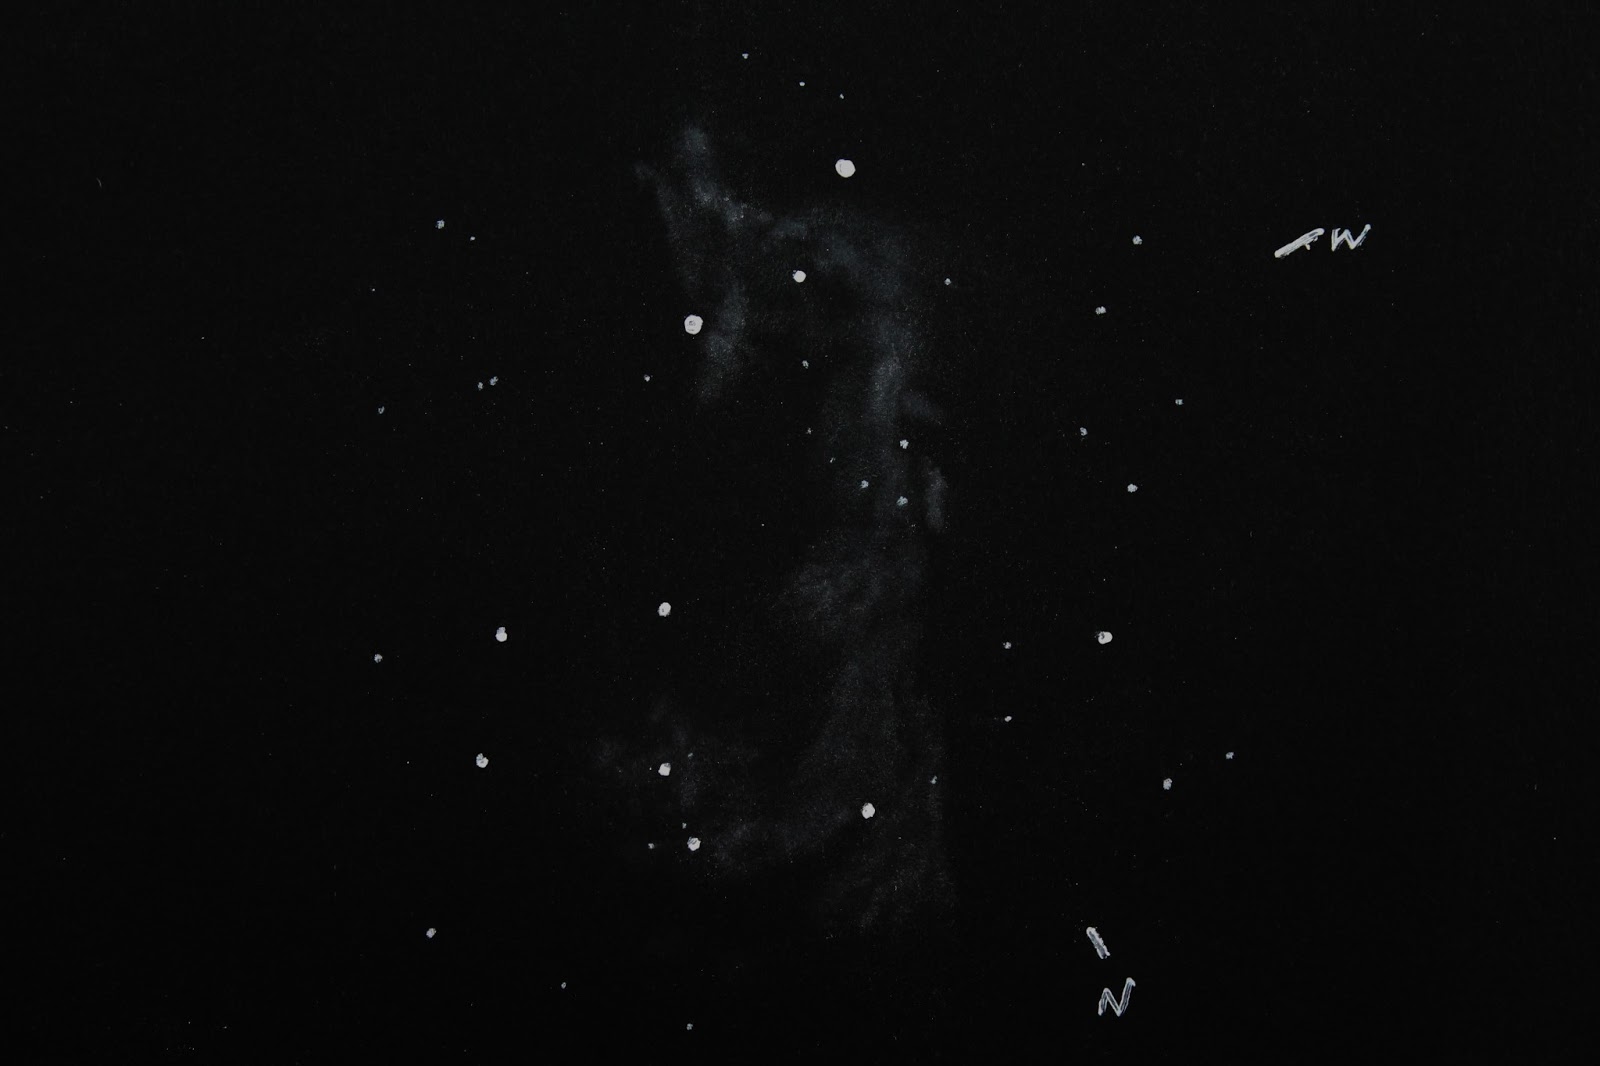
I shared the following in my previous posts to show growth as a sketcher and I decided to share the three posts here to show this object sketched. The two sketches are rather different. The first shows the structure that I saw in IC 443 quite well and the second shows it in more detail with higher magnification. The first used both a wider field lens, the 27mm Panoptic I believe with the 14mm and 10mm Pentax XW and Type 1 Paracorr at the time. The second shows the 10mm and 7mm Pentax XW with the Paracorr. Finally I will add in the STSci Image here as I realized I use to do that all the time in my sketches and I think it brings merit. I believe if I recall, in the first sketch north is down and west is to the right.
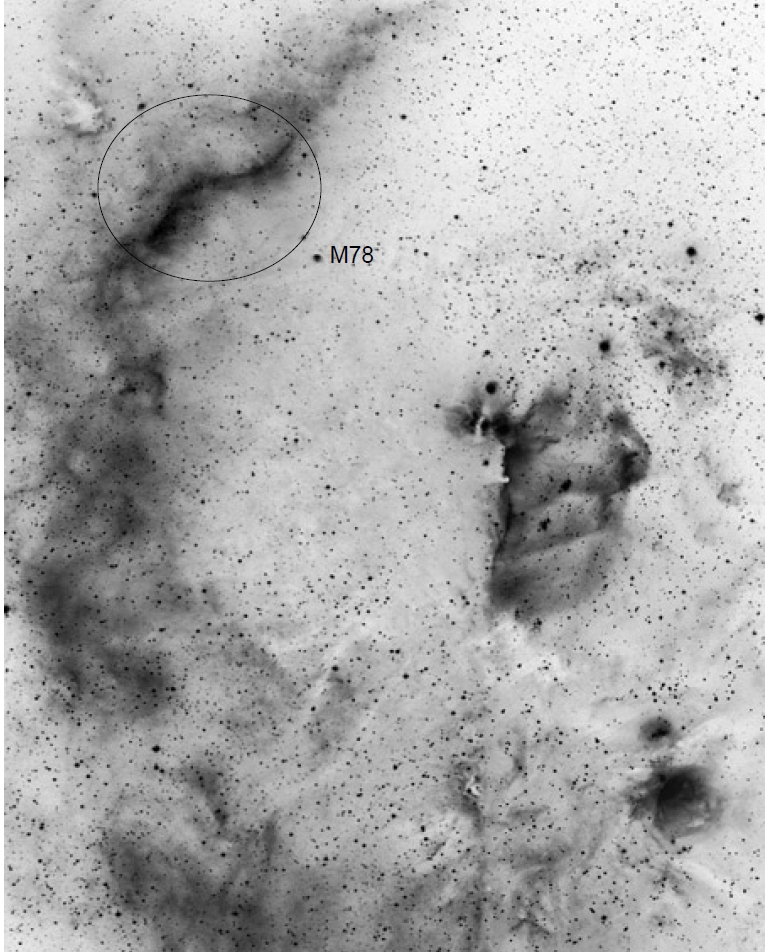
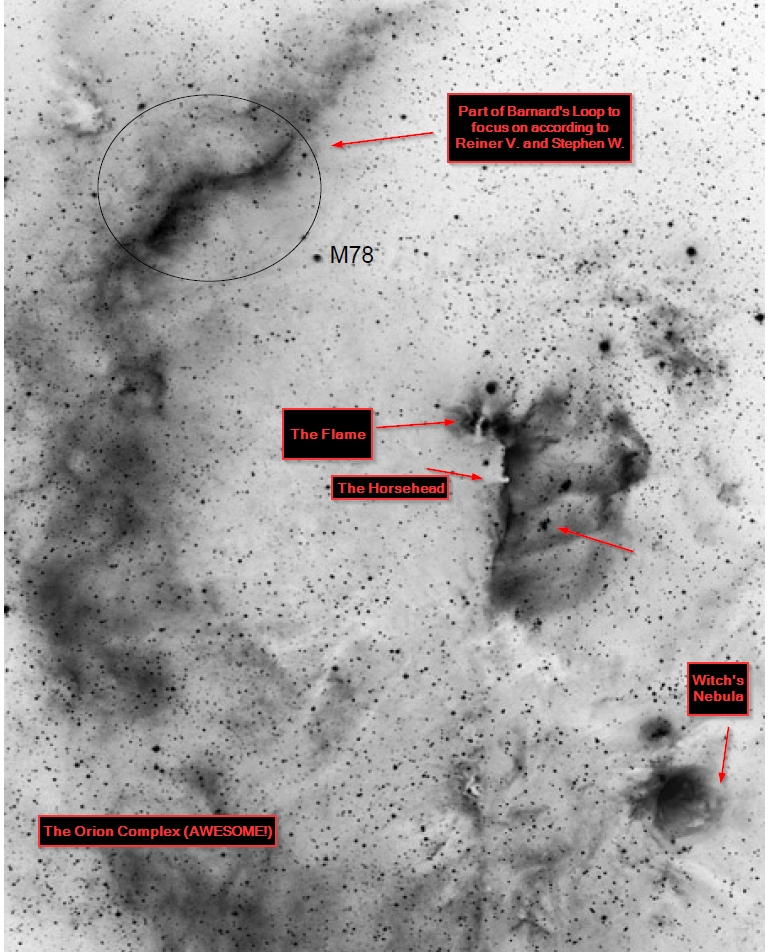
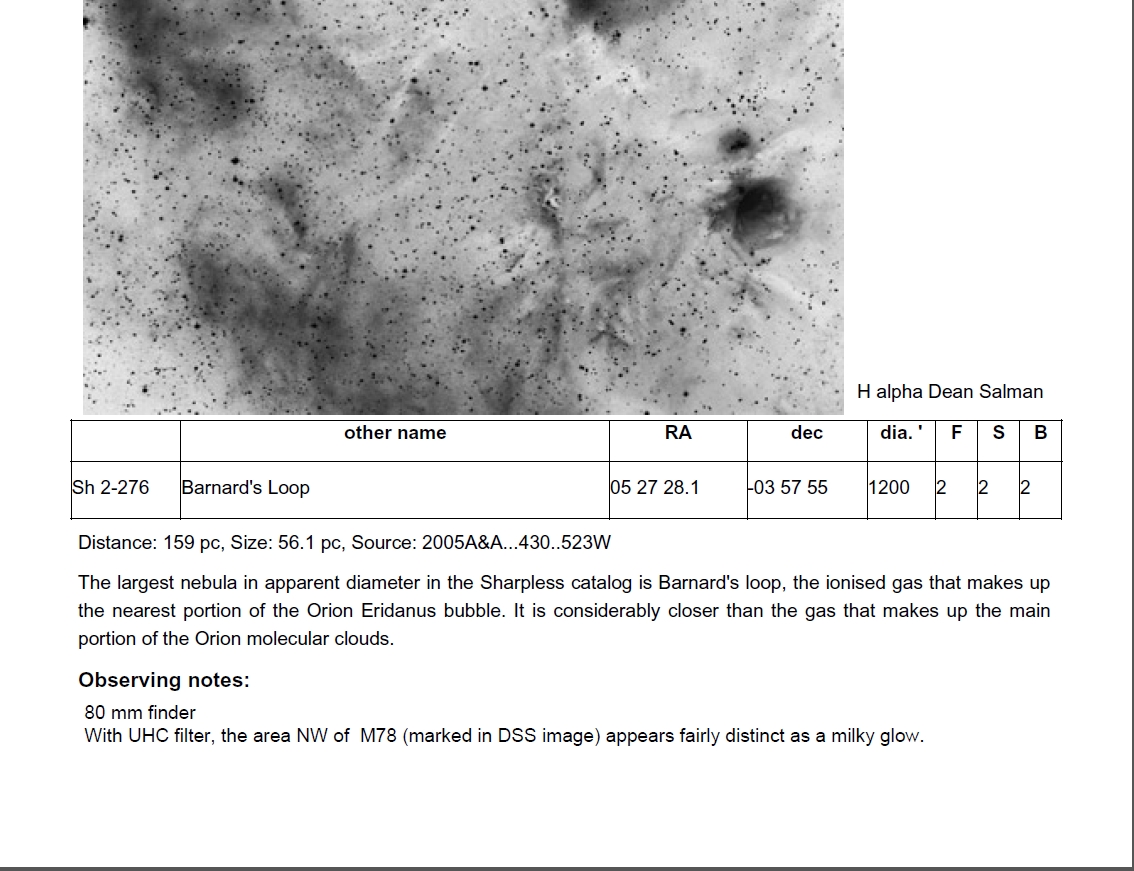
4. Barnard’s Loop Sharpless 2-276 in Orion.
I am including Barnard’s Loop because though old compared to us, it is most caused by winds of massive stars in Orion blowing stellar winds out or by Supernova’s that exploded and created the bubble. Discovered in 1894 Barnard’s Loop (catalogue designation Sh 2-276) is an emission nebula in the constellation of Orion. It is part of the Orion Molecular Cloud Complex which also contains the dark Horsehead and bright Orion nebulae. The loop takes the form of a large arc centred approximately on the Orion Nebula. The stars within the Orion Nebula are believed to be responsible for ionizing the loop.
The loop extends over about 600 arcminutes as seen from Earth, covering much of Orion. It is well seen in long-exposure photographs, although observers under very dark skies may be able to see it with the naked eye.
Recent estimates place it at a distance of either 159 pc (518 light years) or 440 pc (1434 ly) giving it dimensions of either about 100 or 300 ly across respectively. It is thought to have originated in a supernova explosion about 2 million years ago, which may have also created several known runaway stars, including AE Aurigae, Mu Columbae and 53 Arietis, which are believed to have been part of a multiple star system in which one component exploded as a supernova.
Although this faint nebula was certainly observed by earlier astronomers, it is named after the pioneering astrophotographer E. E. Barnard who photographed it and published a description in 1894.
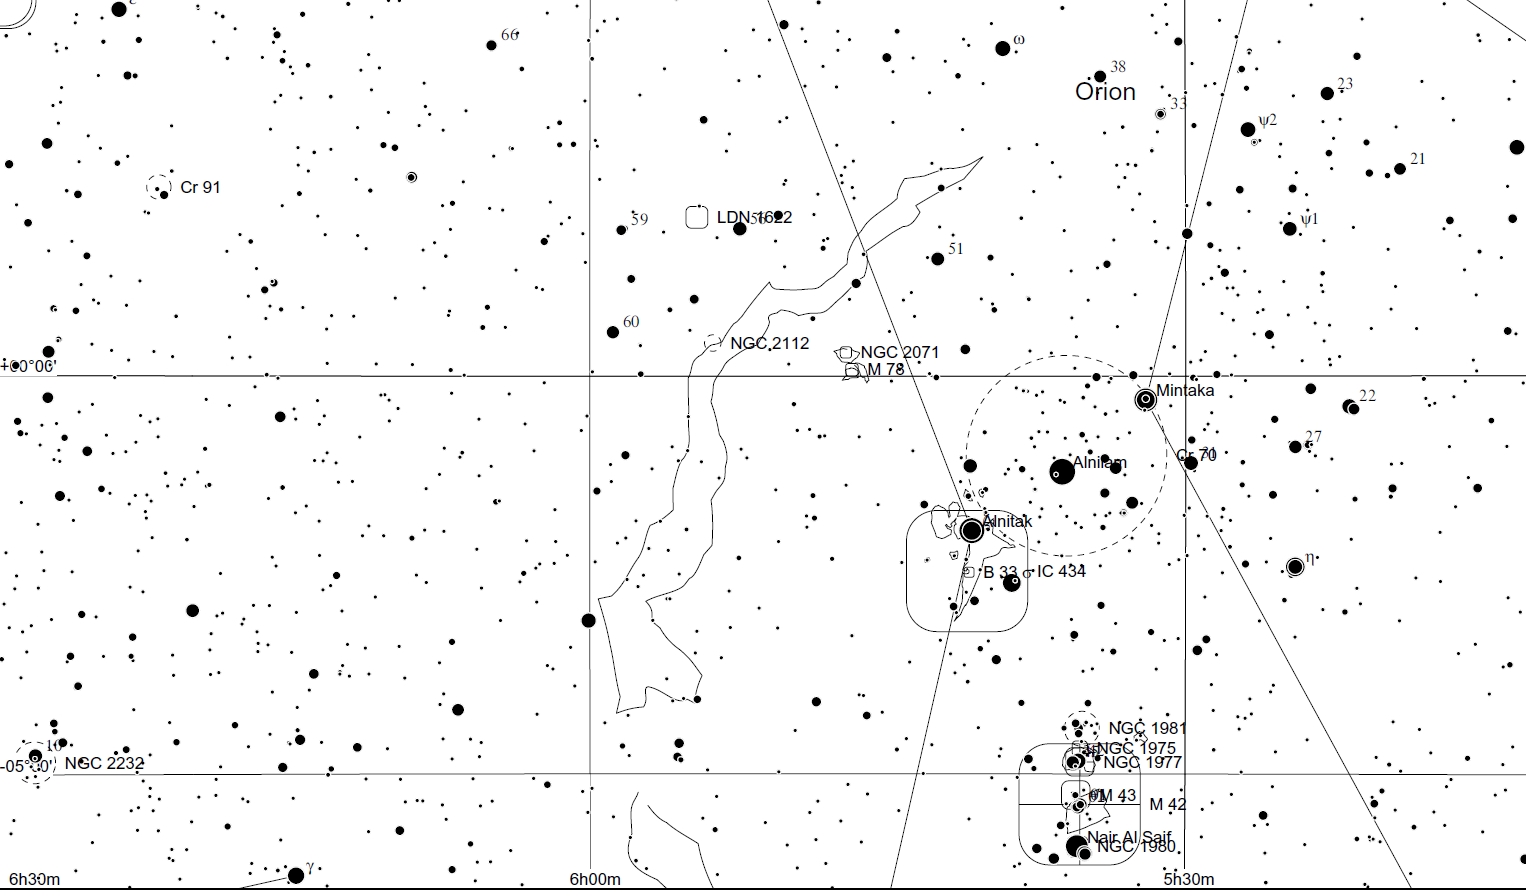
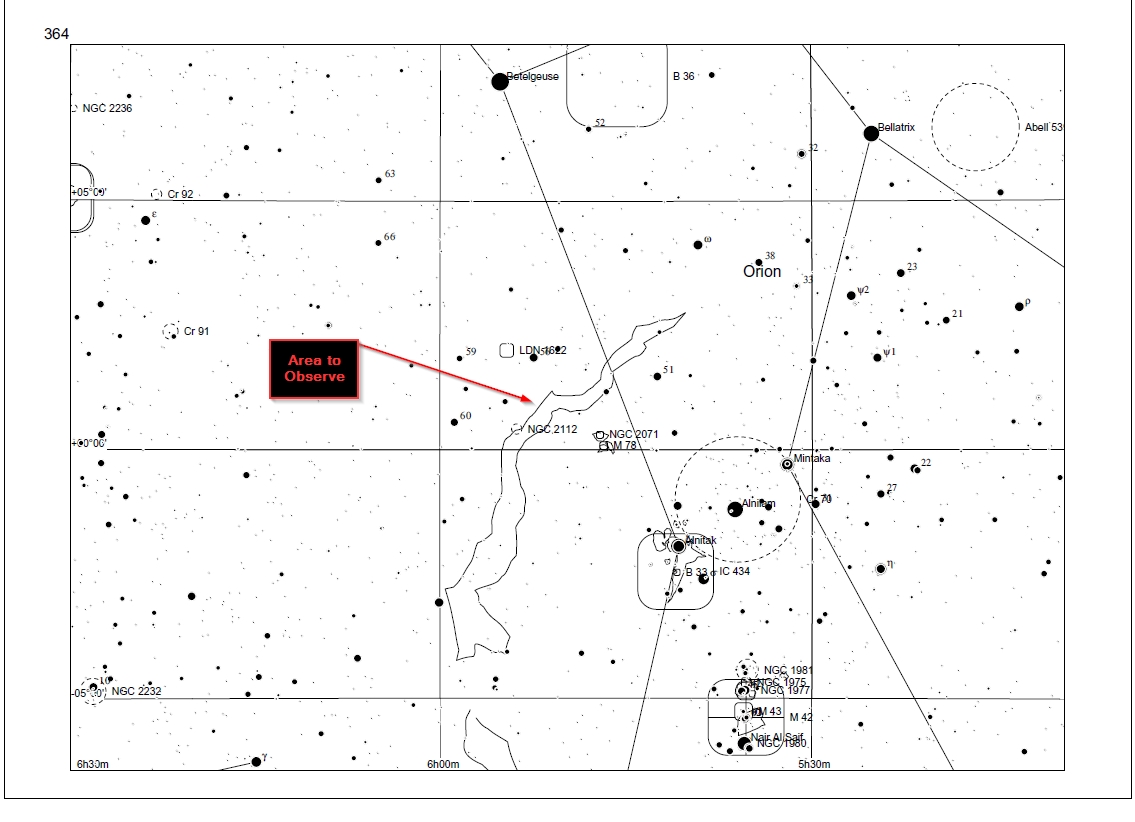
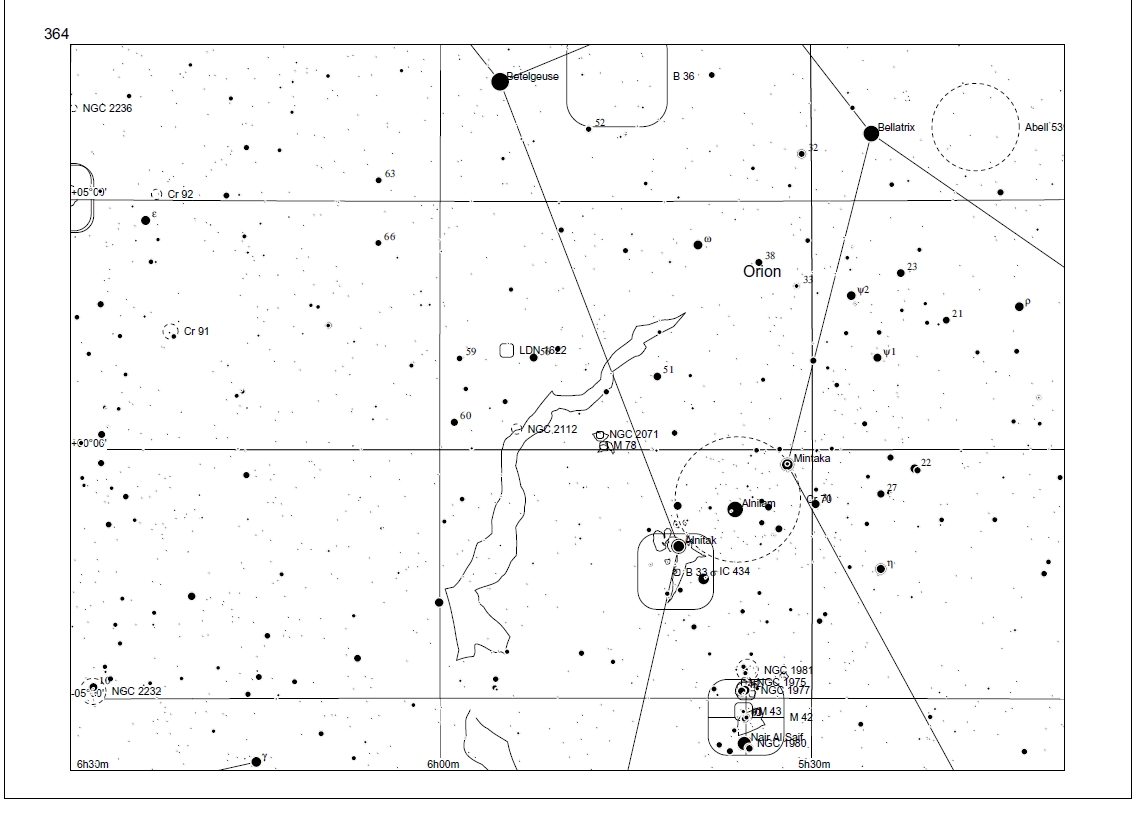
So though not a specific supernova remnant like the other objects here, it is a fun, challenging object to go after in the cold of winter. I want to give it a go with one of my refractors, if not both and see what comes up this winter. Stephen Waldee in his web page as a great article on his observation of Barnard’s Loop, and shares the brightest part that he focused on at this LINK (about 1/3 of the way down the page). Here are the finder charts I gathered and enlarged from Reinar.

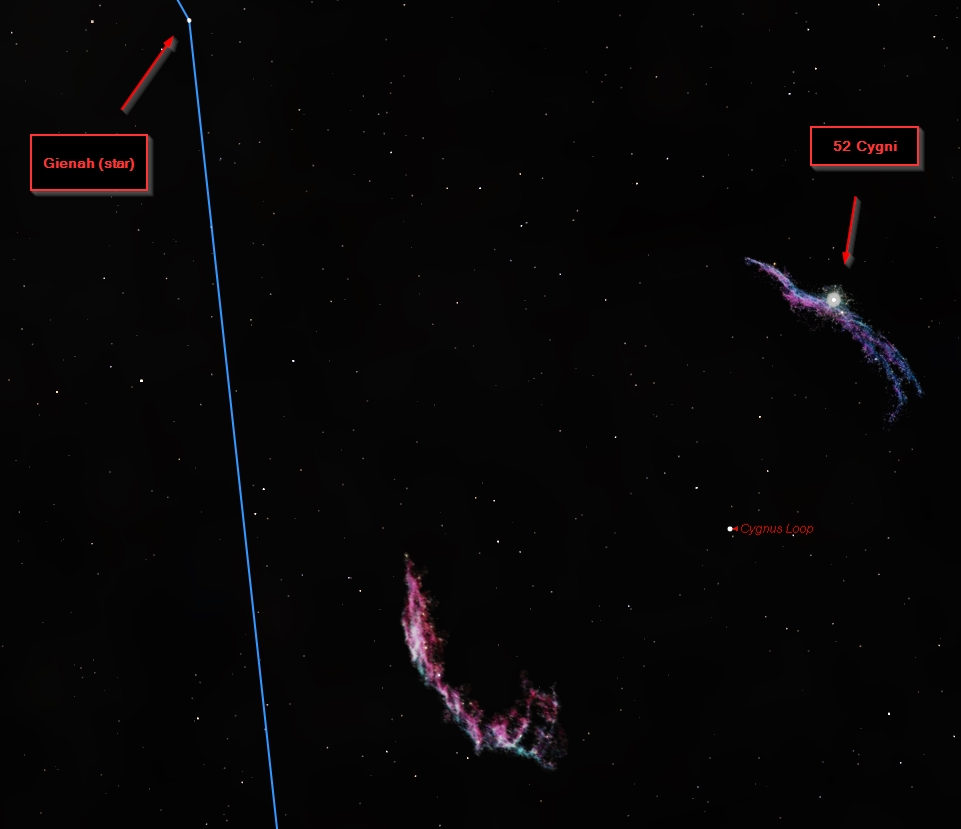
5. Veil Nebula: NGC 6979, NGC 6960, NGC 6992, NGC 6995, and other parts.
Well now we leave the confines of winter and move to summer to observe two similar SNR’s that are in the same constellation of Cygnus the Swan. The first is the ever well known and well observed Veil Nebula. Here is a decently recent NASA image of the Veil Nebula that has its various parts labeled and identified.
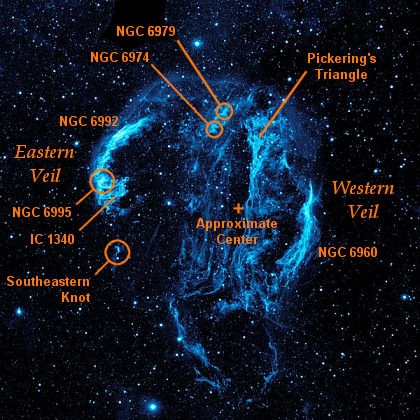
What is interesting to me, is that in looking online for over two hours, I found spots and pieces, professional articles but not a lot on this tremendous object. Most of us have looked at NGC 6960 and NGC 6995 in our telescopes. I encourage you this time not to rush your observation, but to really study the details and seek out the parts that you haven’t seen or studied before. Pickering Triangle sticks out for me as a place to go to and really study as does NGC 6979 and NGC 6974. This LINK provides Steve Gottlieb’s view of these two areas in the NGC/IC Database. This LINK to J P Metsavaino work shows Pickering’s Triangle with detail and this LINK to his page will blow you away. Finally I love his animated view of the entire Cygnus Loop in this LINK over on his YouTube channel. For me personally, I need to view the Southeastern Knot and I need time studying IC 1340 (I have observed both of these before) and Pickering’s Triangle. You’ll need to determine your goals on these objects.
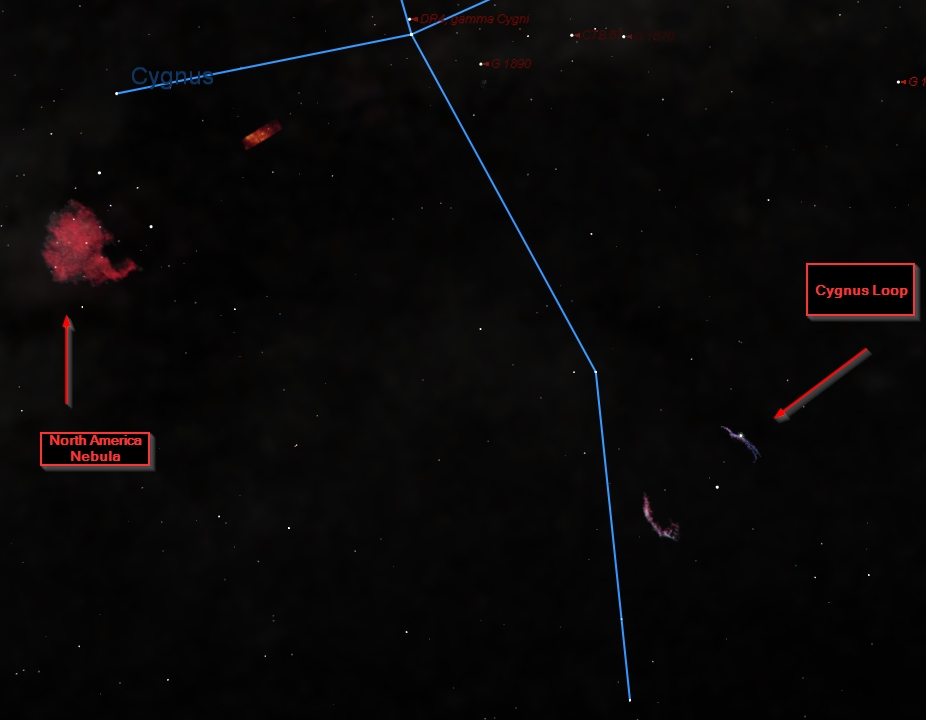
Here are two quick findercharts in case someone doesn’t know how to spot the Cygnus Loop.
7. Cassiopeia A
This is a unique supernova remnant and I have observed it before LINK (sketch and observation at the bottom of that post). In truth, it is my desire to observe this object again this fall that made me put this post together. To be truthful, this is my major sketching project over the next year or so (as I observe my the Herschel 2500 and sketch them as well) that I want to make a compilation of to submit for publication. I think that will make a good adventure, observing the visual SNR of the Milky Way. Anyway, Cassiopeia A is observable and Sue French in the December 2013 Deep Sky Wonder column discusses it.
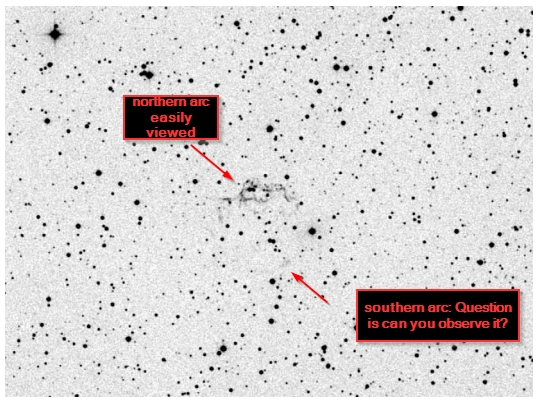
Deep Sky Forum at this LINK by Howard has a wonderful entry of his observation of Cassiopeia A of the main arc. I also as in my post above captured that but Howard mentions going after the southern arc and that is something worthy to emulate. Howard states there (and please read his entire post, it is worth it) ” Cassiopeia A is plotted in Uranometria (page 18). I’ve found that star hopping from M52 to the Bubble Nebula (NGC 7635) and then along a ragged line of faint stars to Cas A is a relatively easy way to get to the right spot.
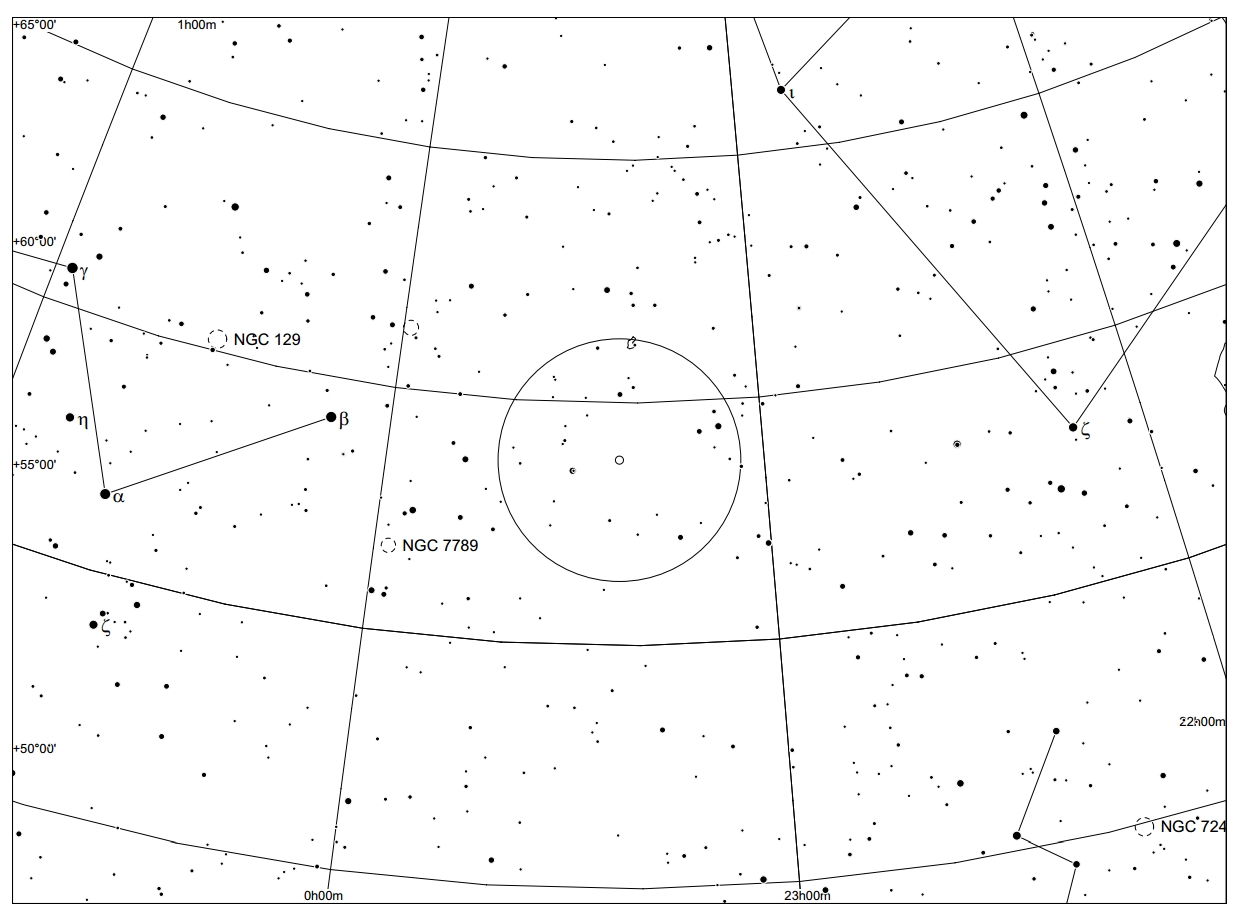
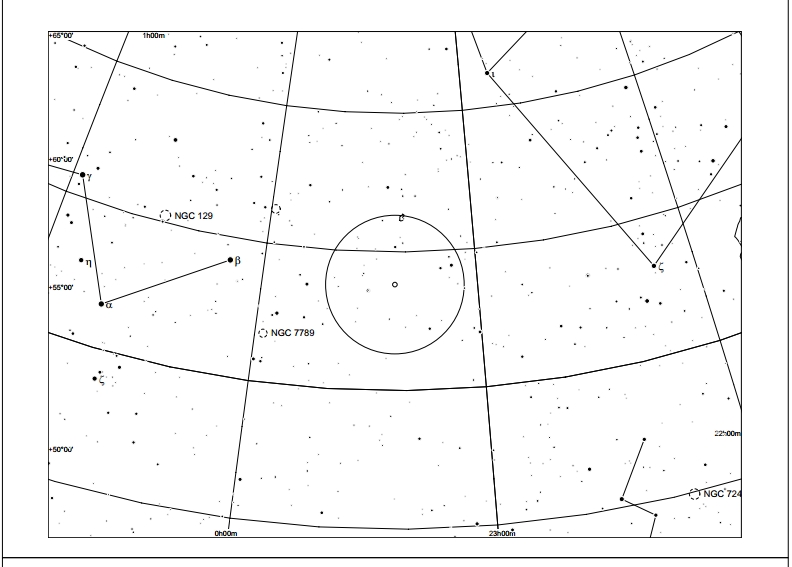
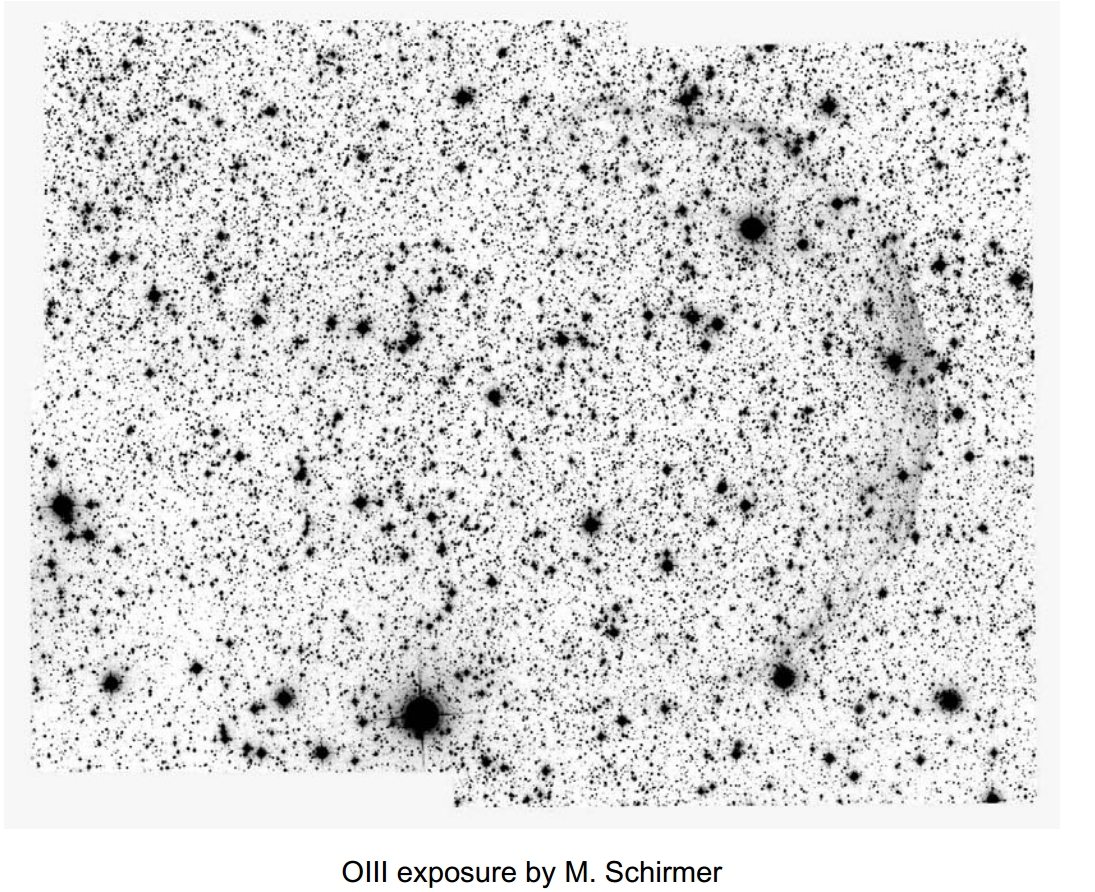
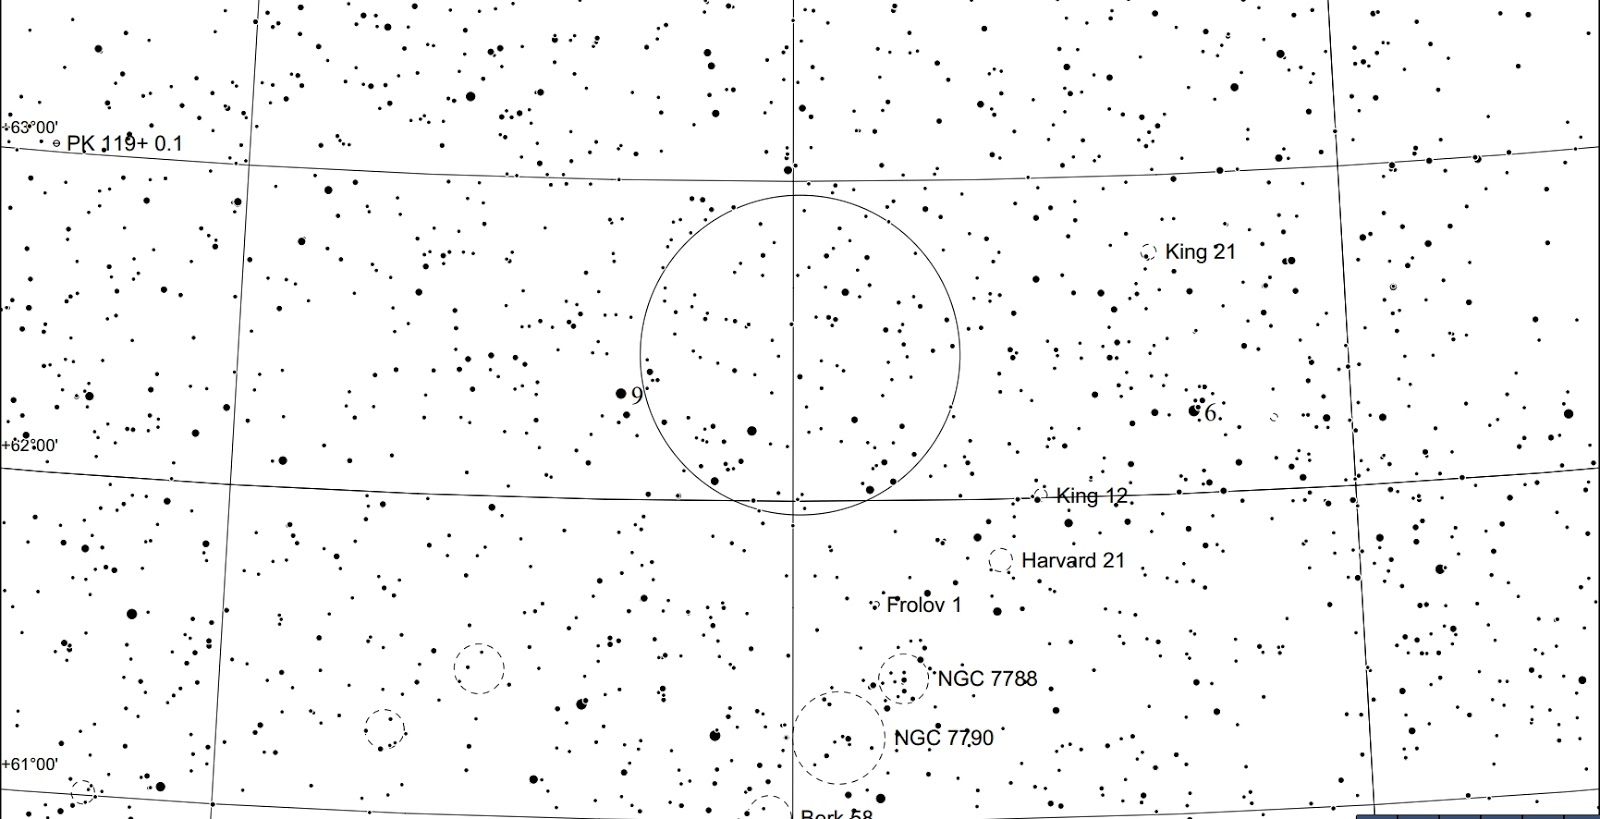
To see what Cassiopeia A looks like photographically, Markus Blauensteiner has a wonderful capture at this LINK. Scroll over the image and a circle will go around it. If you look carefully you can see the southern arch of the SNR. Okay, lots of star hops views coming up.
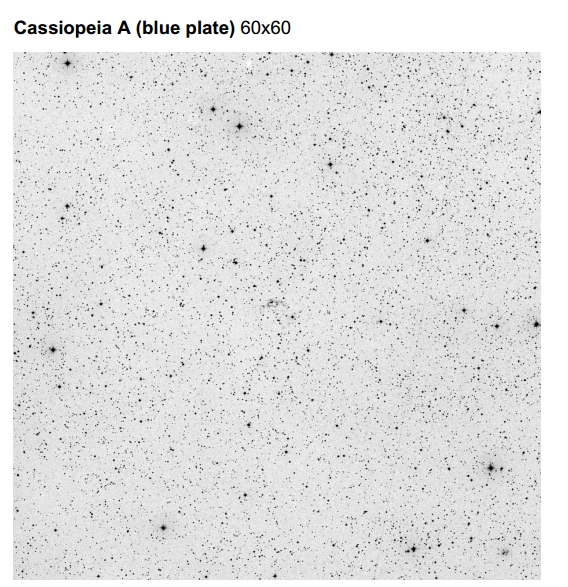
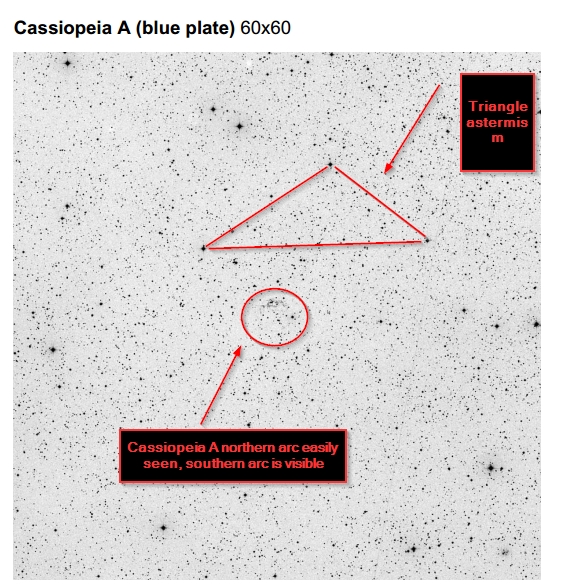
The plate above shows the field of Cassiopeia A in a somewhat wide field. You can see Cass.A in the middle and if you look, you can see the southern arc.
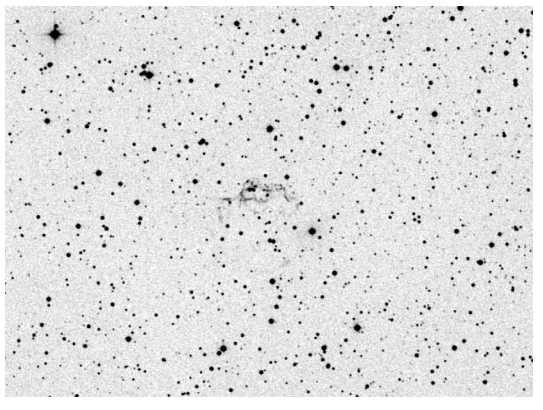
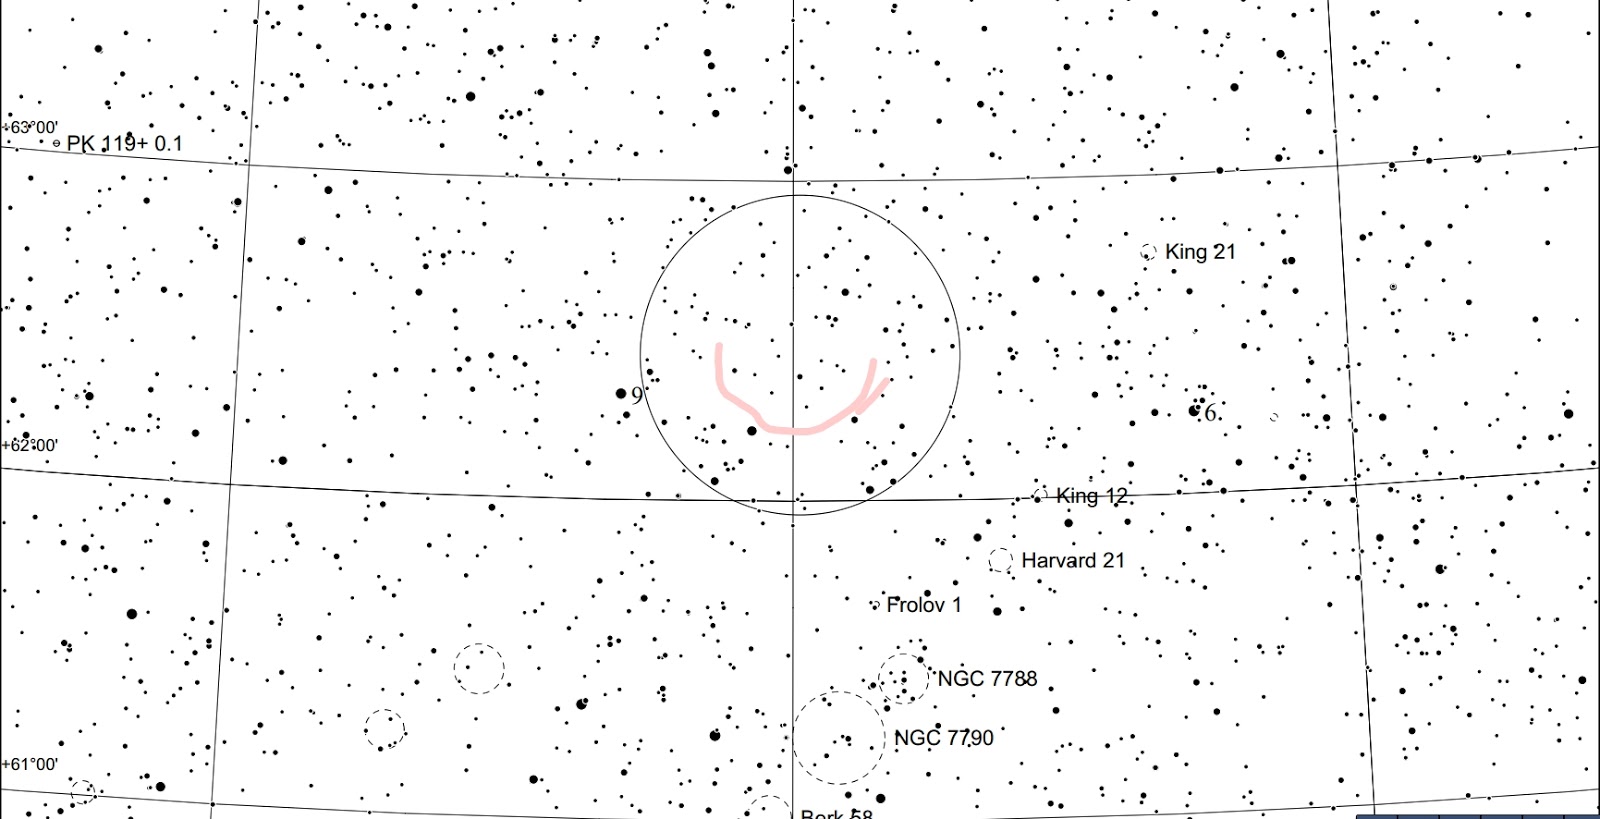
In the plate above here is a closer view of Cassiopeia A with its northern arc showing nicely and the southern arc is in view here.

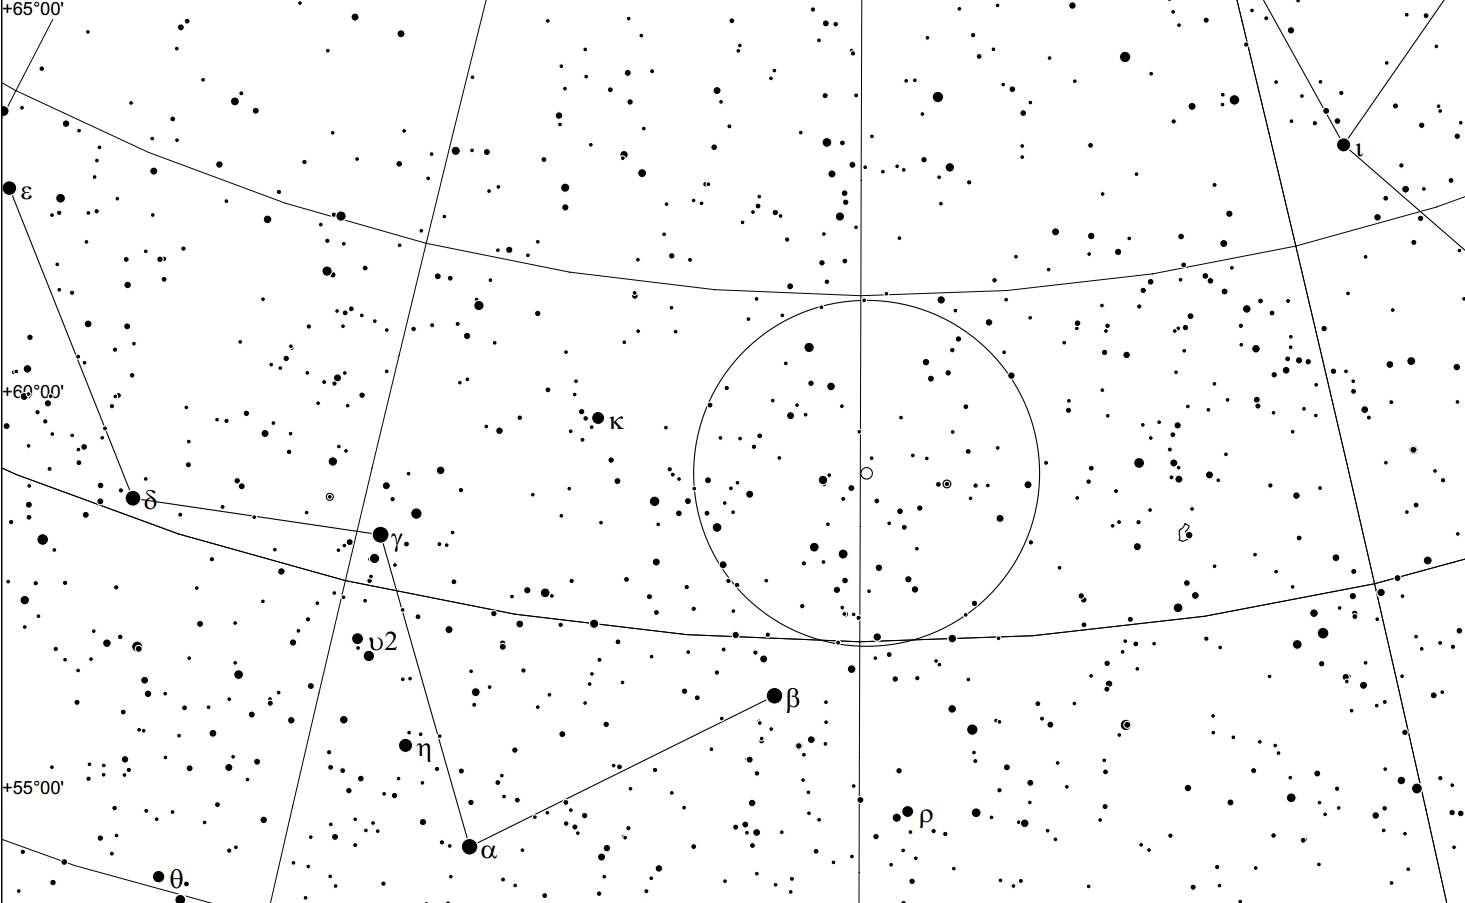
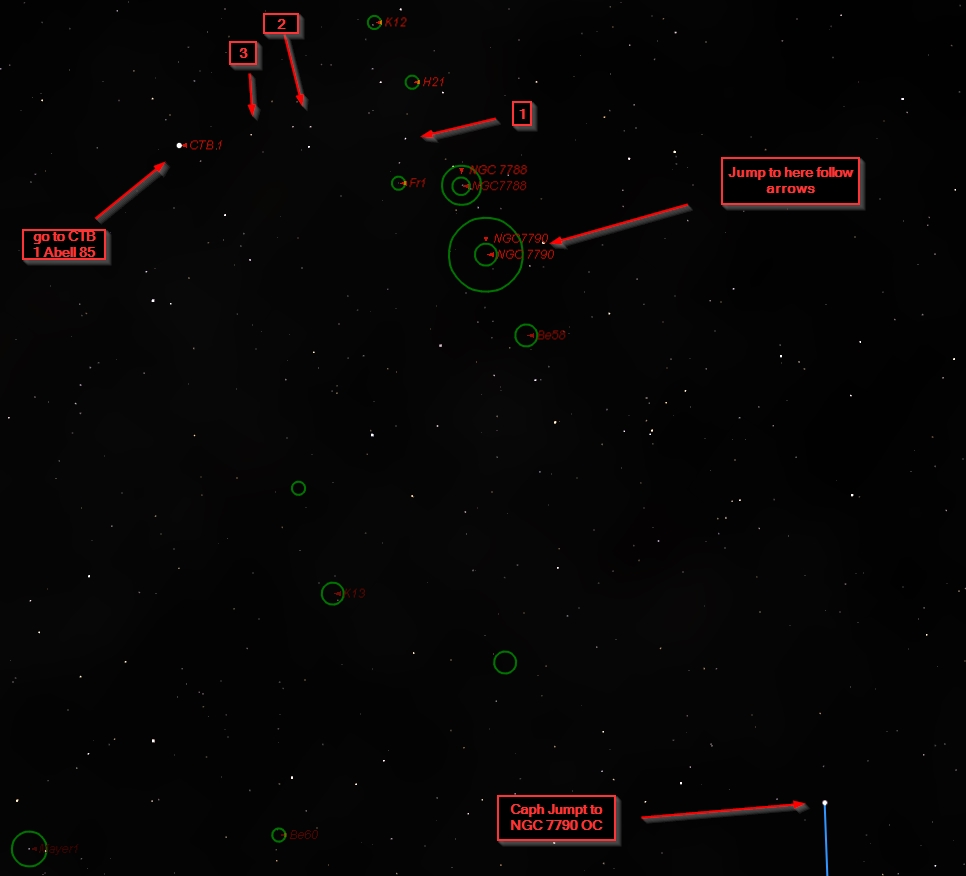
The finderchart labeled here is ONE WAY, not the only way to get to Cassiopeia A. You will see in the Starry Night Images below that you can get to M52 and then hop right down to it.
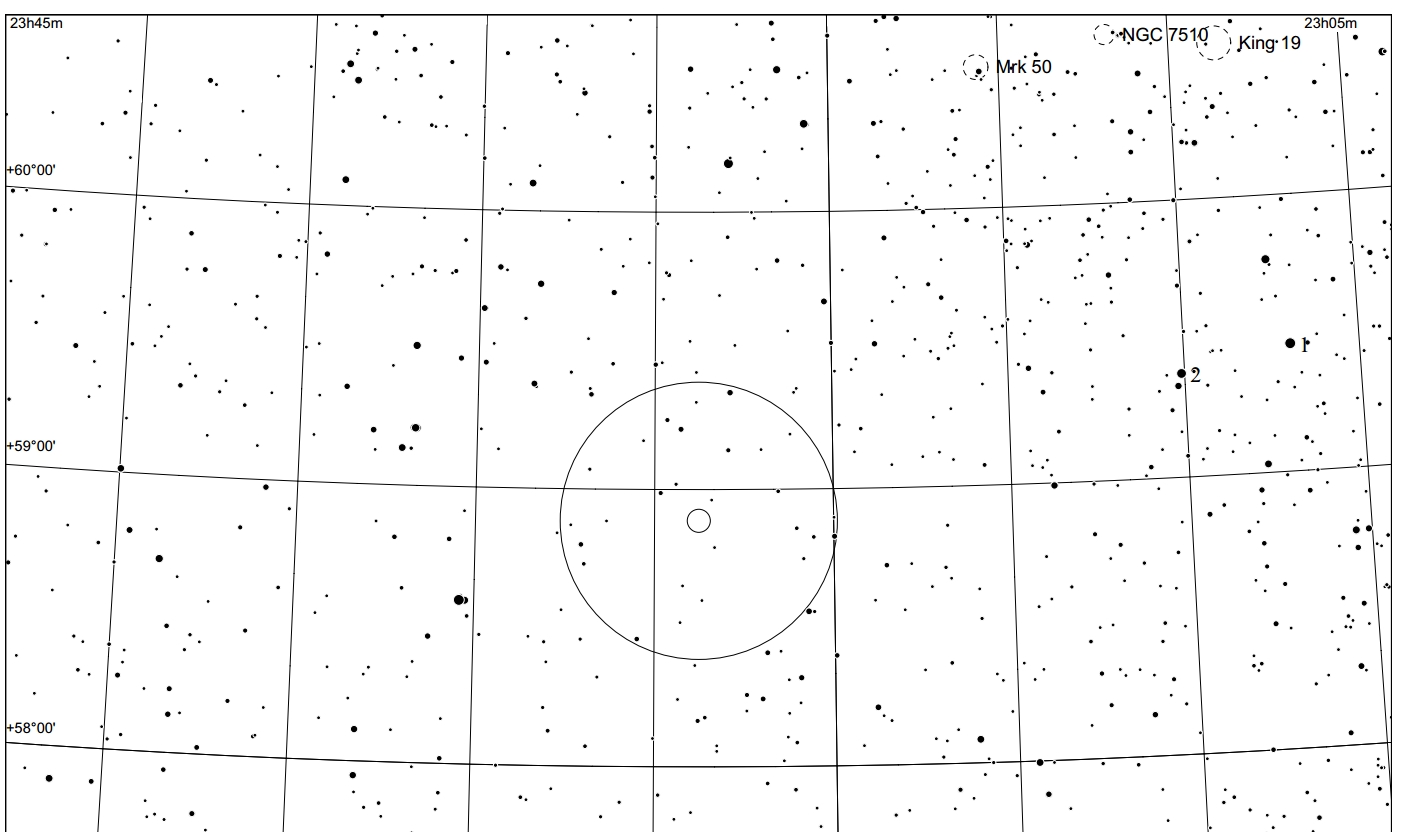
This is the close in finderchart for Cassiopeia A.
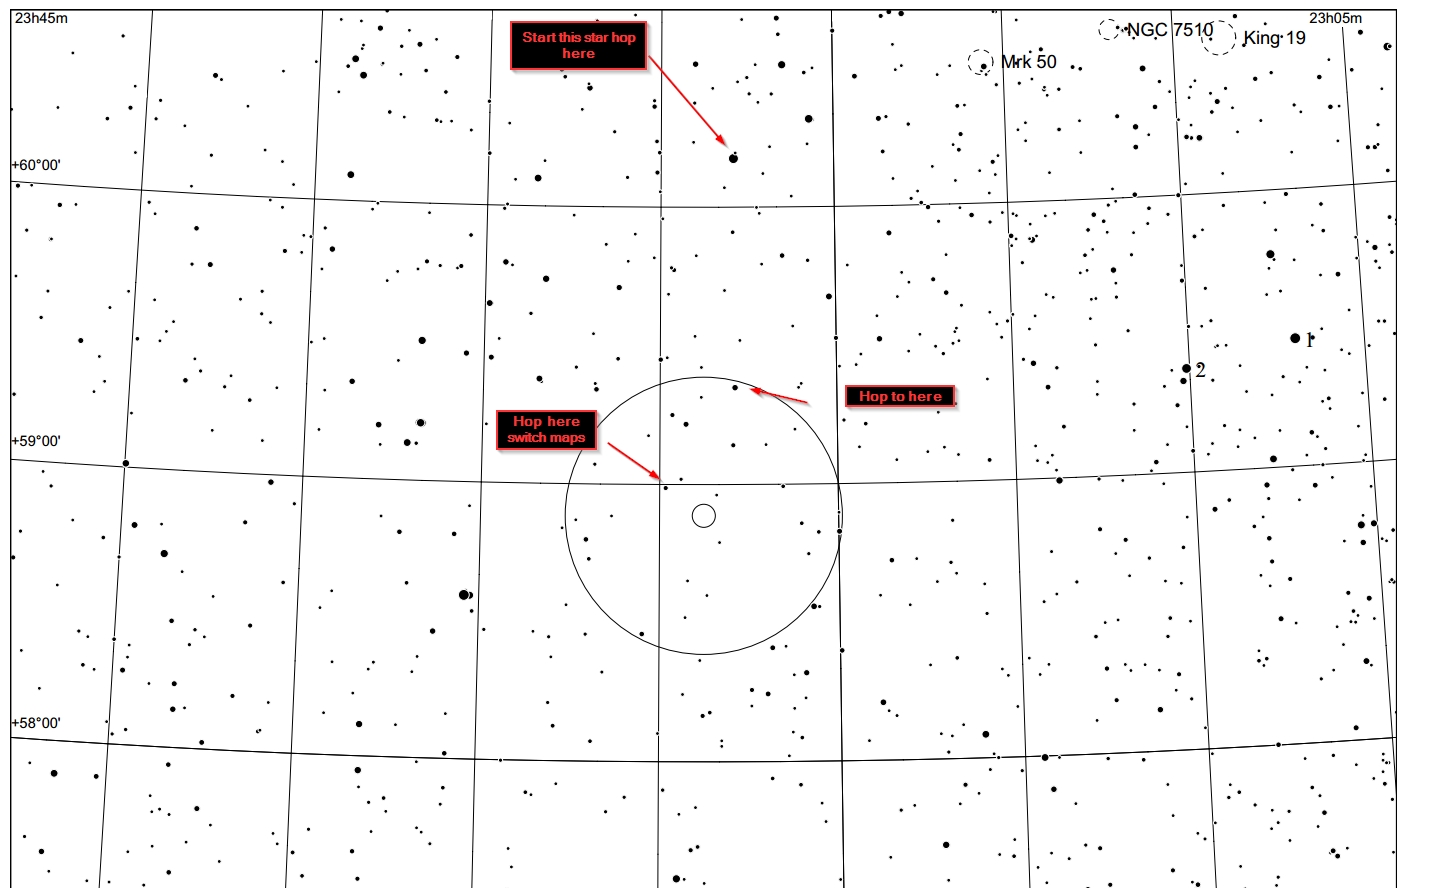
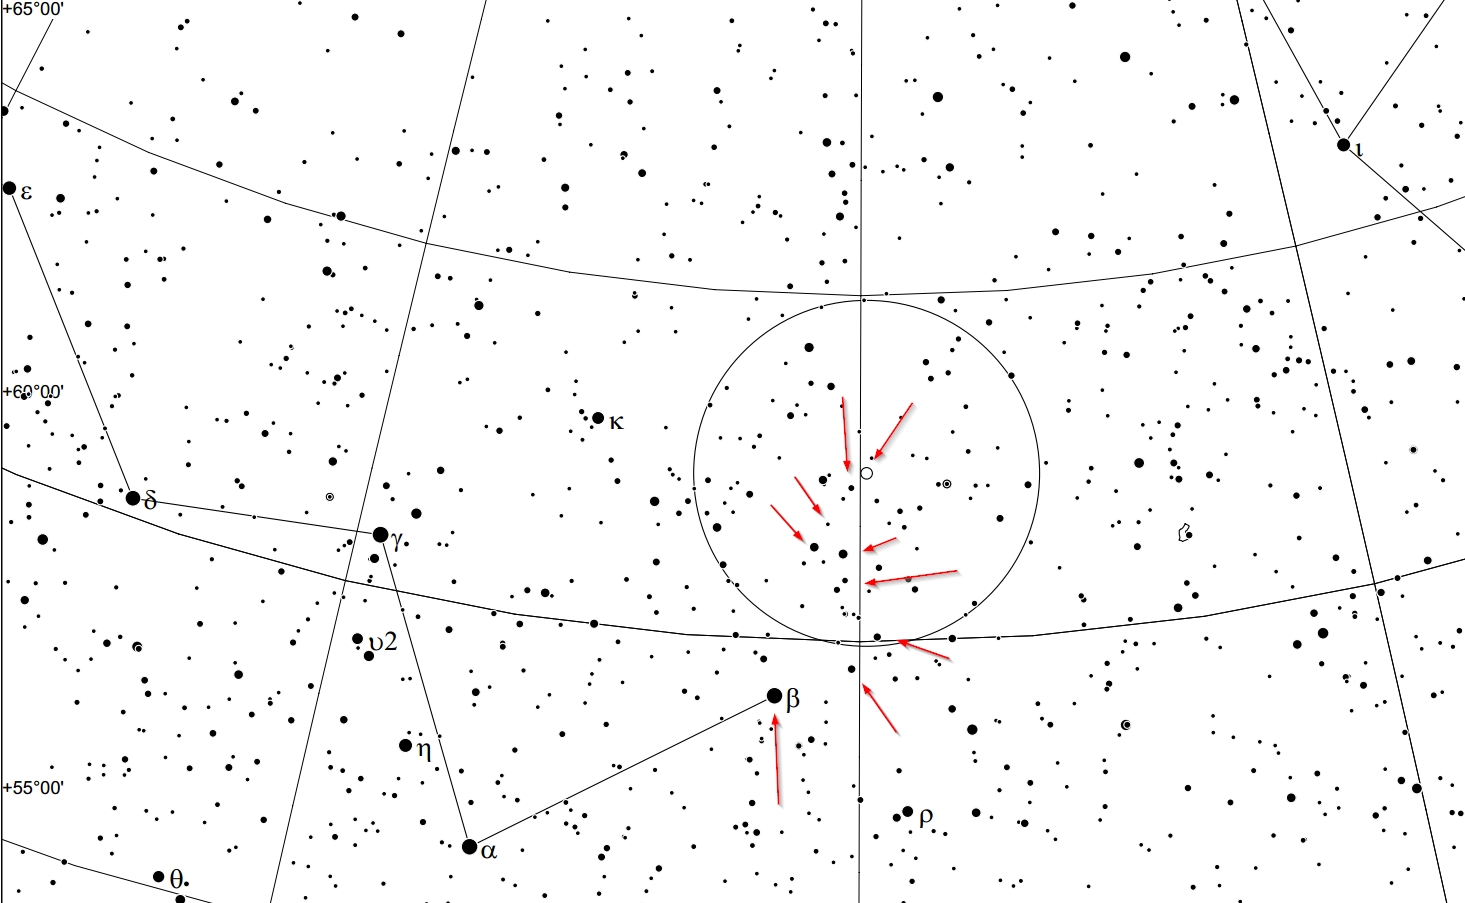
I have labeled how I star hop to Cassiopeia A and then use the images above to complete my hop to this fun object.
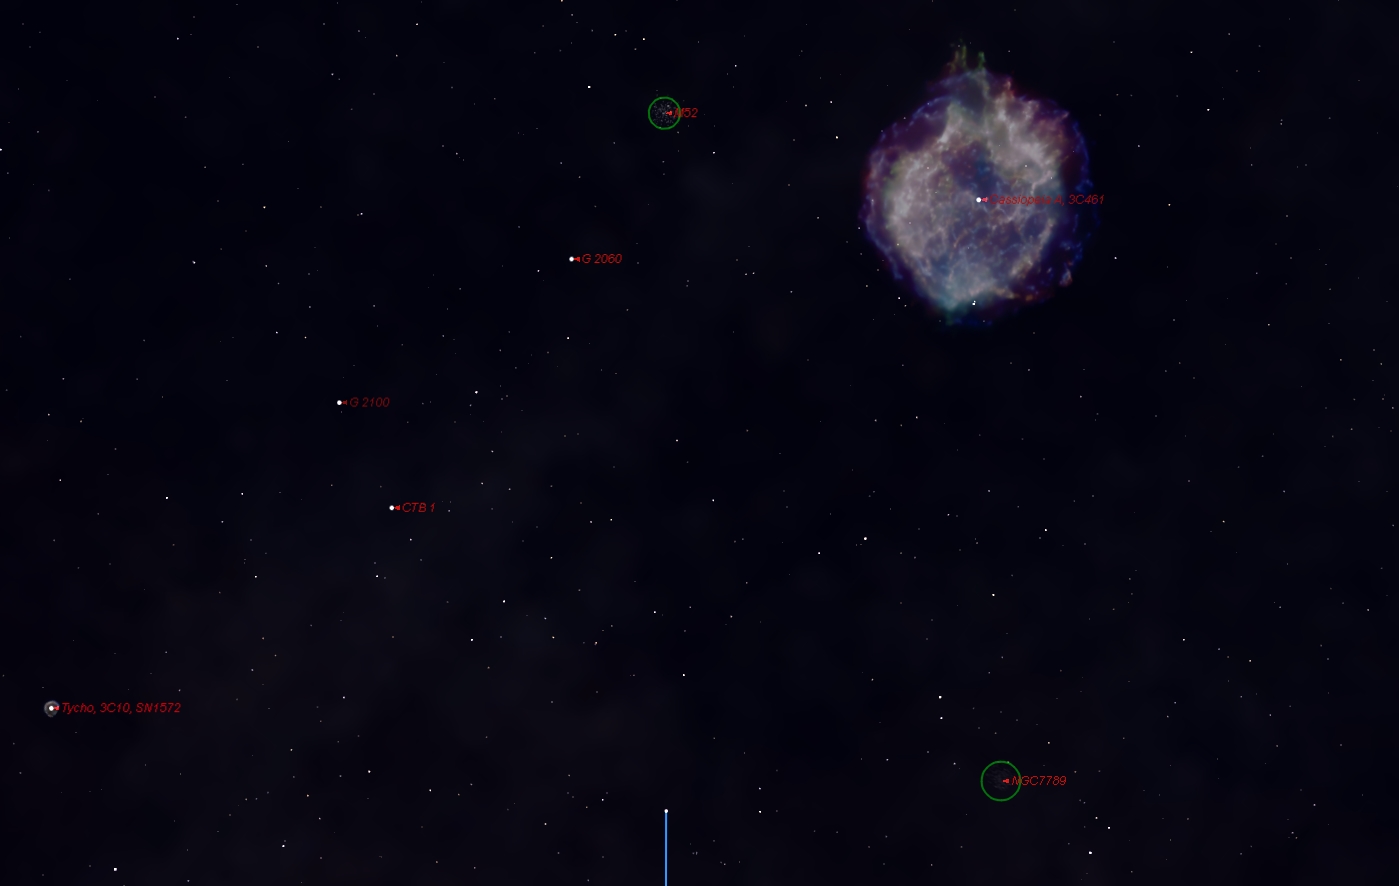
Starry Night 6 I use somewhat (Sky Tools 3 is my main astro software) but here it is decently effective. Please note you just need to Star Hop to Messier 52 here. Also, Tycho’s SNR is labeled here but DO NOT try it. This links answers the question if parts of SNR 1572 are visible LINK. Right now, no but then again, neither was Cassiopeia A in the past. North is to the left, south is to the right, east is up, west is down in the Starry Night 6 images.
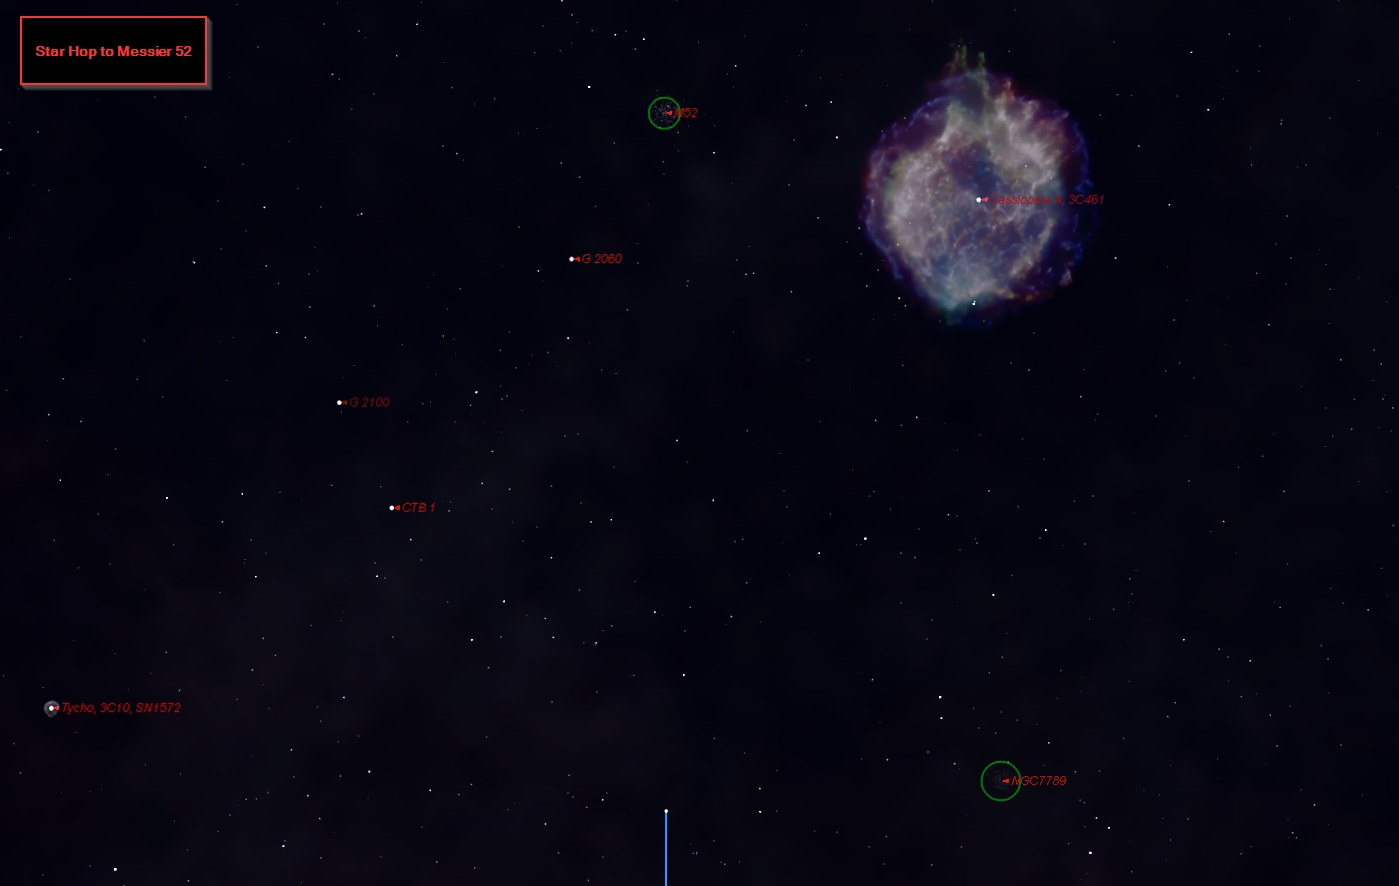
Repeat
Here I have labeled the key parts to this star hop. How you decided to go from Messier 52 to the triangle is up to you. Once at the triangle you should be able to get it with these and the images above. Let others know how you did with this. Remember a dark site, clear transparent skies and aperture help to nail this one.
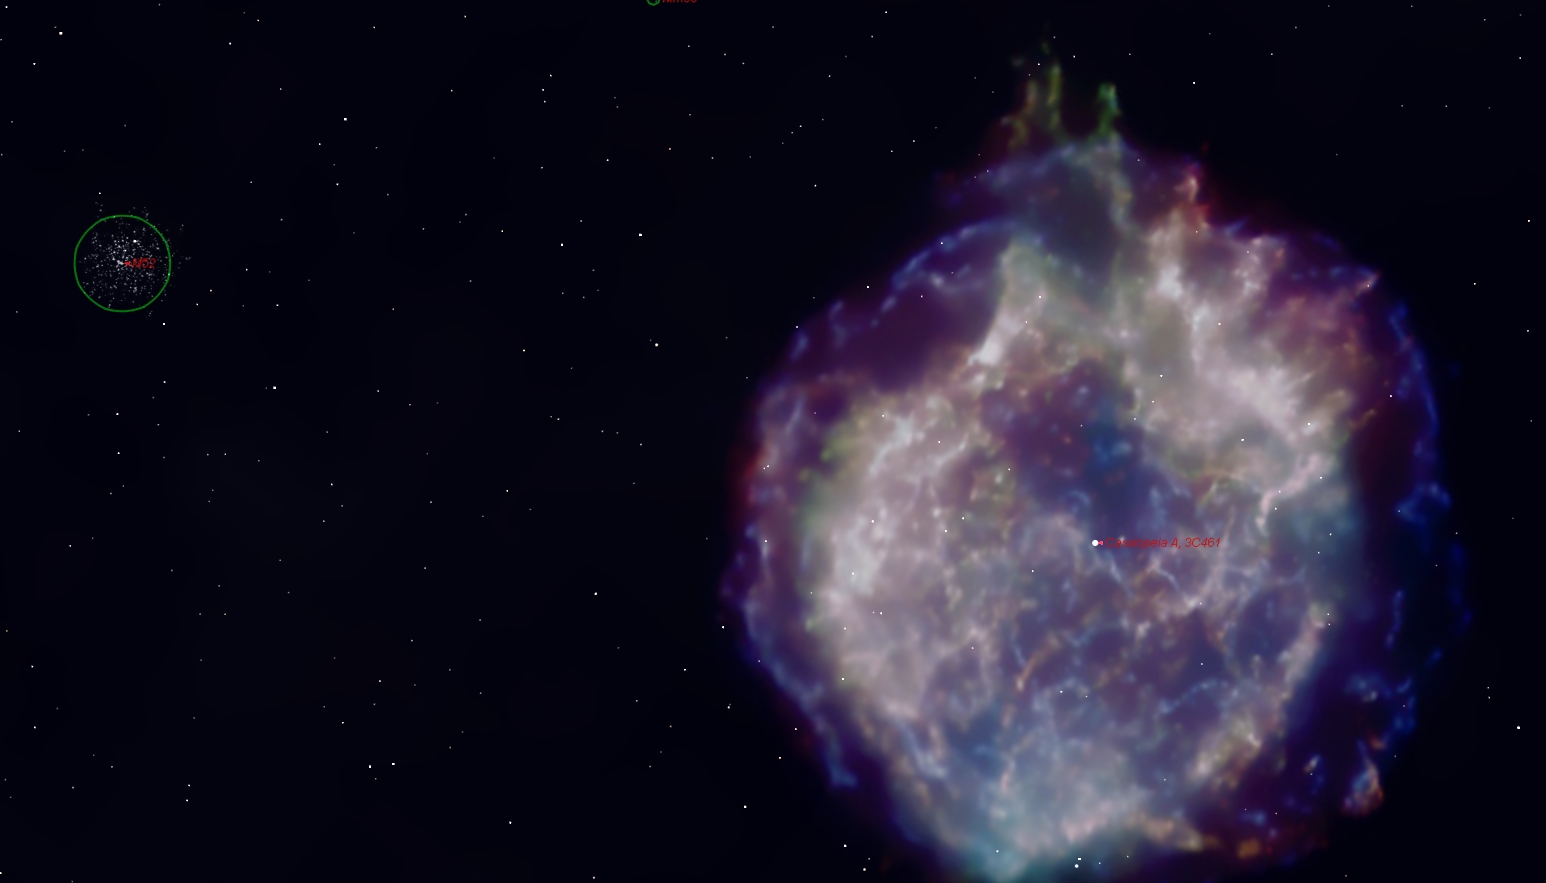
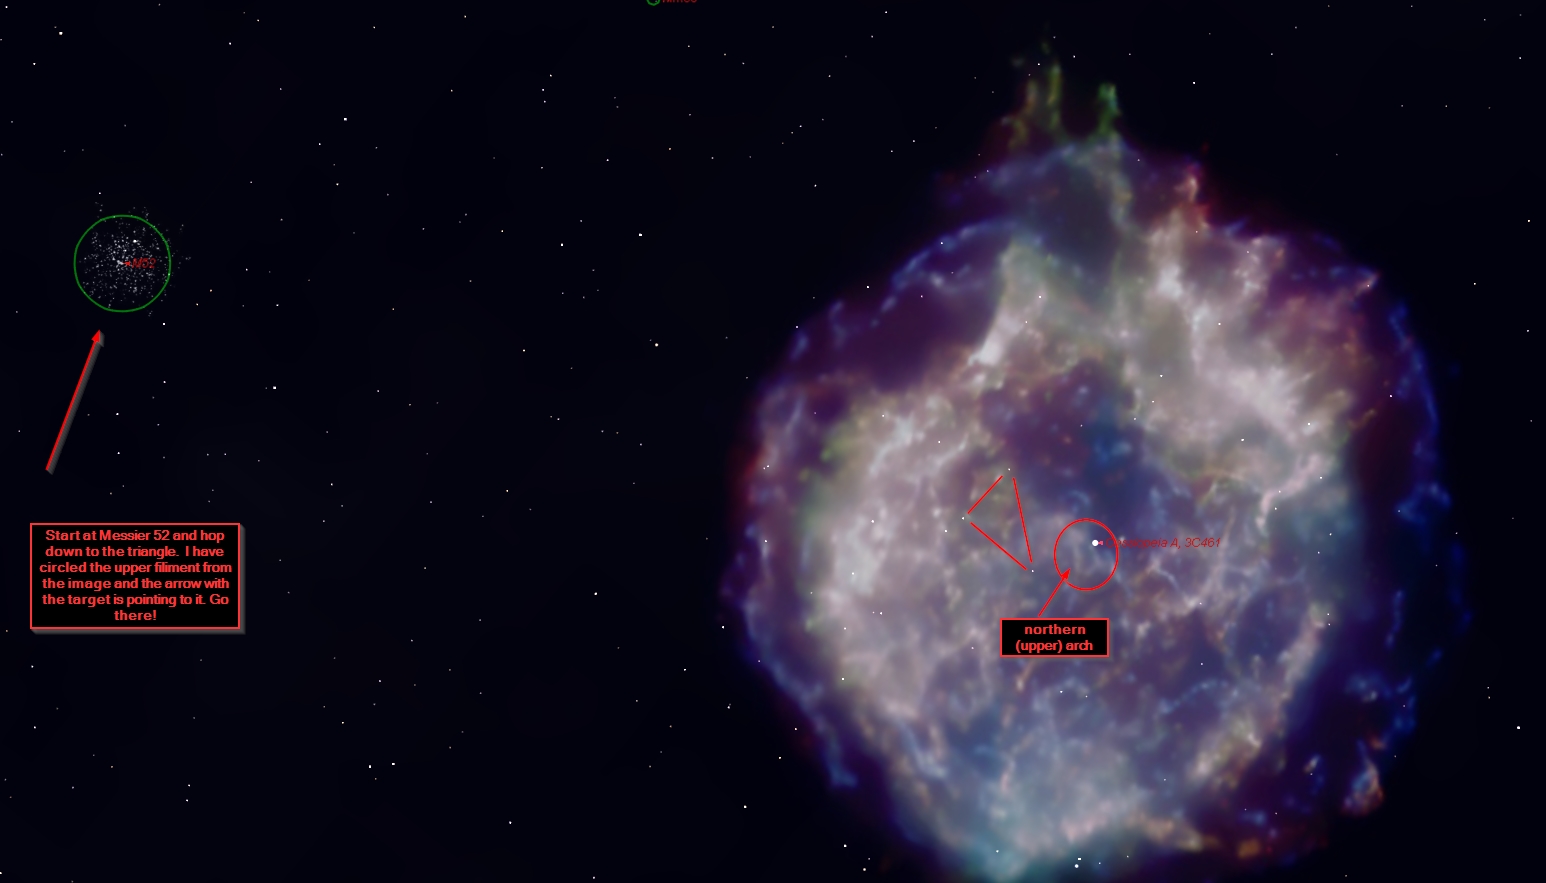
Finally, here is the STSci Image of Cassiopeia A. You can see the ring in this image easily.

The wide field map from Starry Night Pro 6. It may help but I think the charts above are excellent so those are the ones to go with. I can’t wait to give this one a go real soon!
Well there you go. 8 SNR objects or related to an SNR in some way in the case of Barnard’s Loop. I hope some of you give this a go and let me know how your observations of these objects go. I am sorry I have no reward other than the fun, frustration, and the challenge of seeing some of these faint SNR that exist in our own Milky Way Galaxy. Perhaps in what remains of our short lives we will have the opportunity to see a bright supernova that will create a SNR for our descendants to view one day! Enjoy the wonders of the night sky!
EDIT: I made a place to discuss anyone’s attempt at this challenge over in the forum I have for those who want to share their sketches, discuss sketches or their own observations or whatever (I think I listed about every type of forum you can find there). Here is a LINK to the thread I made on the Supernova Remnant Challenge at AstronomyforAll.
